Introduction
Sweet Home for Vantage allows you to manage, control, and monitor Vantage Infusion automation systems with iOS and Android touch devices.
This software is intended for the Vantage installer. All graphics and programming interface must be implemented within the Infusion Design Center.
The interface works both locally via Wi-Fi network, or remotely using the 3G/4G
network or Wi-Fi.
Once downloaded –- which may be done for free via the Apple or Google store - the
application can be tested by enabling the Demo Mode function. In Demo Mode
both the graphics and the page navigation functionality are already activated
and displayed without overlaps.
The Communication function requires authorization via a license code which must be purchased through the website www.sweethomeforvantage.com and activated as explained in the following chapter.
How to use sweet home for vantage
To turn your devices into a touch screen it is necessary to complete the following simple steps:
- Register on www.sweethomeforvantage.com
- Get a license for the device on the website.
- Download the application for free from the App store or the Play Store
- Activate the communication ticket on the device (or try it in demo mode).
- Load the graphic interface previously exported by Infusion Design Center
- Configure local and remote connection parameters on the device.
Compatible devices
- Any iOS Device with iOS 10.0 or above.
- Any Android Device with Android 5.0 or above.
- Apple TV with tvOS 13.2 or above
Quickstart guide
1. Draw your graphics
Build a touch screen with your DesignCenter
At first, open Vantage Design Center Software.
To begin with, add a Generic TPT touch screen and try drawing a new graphics.
However if you already have an existing touch screen, you can convert it into TPT touch and follow the same tips described in the next steps as if you have created graphics from scratch.
2. Export Graphics
Export your graphic file locally
When you procured some valid graphics, to proceed choose Design -> Export in Touchscreen Designer.
Click on <Export Files...> and select a local directory to export all files needed.
Now, in the destination folder you will find a configuration file named LCDconfig.xml and all the others graphics resources.
3. Upload Graphics
Prepare and Upload Graphics to your device
In the local directory in which you export the graphics, compress all the file in Zip format and name the archive how you like.
You can adopt 3 solution to load zip file on devices:
Connect your iOS device to a PC/Mac, then in iTunes, go to File Sharing of the Device. Choose Sweet Home App and copy zip file to destination as shown in the second figure.
As shown in the second figure, in the system configuration you can click on "select graphics" button. It allows you to browsing through native resources of your device.
The first step is opening the cloud system configuration for a system from licences page on this site. There, you are able to upload configuration and/or graphics zip file. For downloading these resources on the app, you can go on system configuration view.
4. Activate the Licence
Activate your licence to communicate
In order to enjoy communication between the app and the Infusion Controller, you have to activate your licence.
If you have not yet any configured system, the app goes directly on "Ticket Activation" page at startup. In other cases, just press the screen for several seconds.
In the "Ticket Activation" page, insert the account Email and the Ticket number of your Licence.
Finally, click on “Activate Licence” button.
If successful, the bottom banner becomes green and a popup message confirm you the activation.
5. System Configuration
Configure all your Vantage Systems
Depending on your licence type, you may have one or more Vantage Systems configurable on Sweet Home. The configuration of your systems can be done into "Systems" page, as shown in the first figure.
For each system, you have to insert: System Name, Local Ip, and Local Port; other parameters are optional.
Please refer to Software Manual for further parameters configuration.
Operator Mode
Operator Mode is the control panel where the installer sets the application Sweet Home for Vantage.
When the application is launched for the first time after installation, you will automatically be redirected to Operator Mode.
If, instead, it is already presenting a system, you are required to hold for 6 seconds
anywhere on the screen presented.
Operator mode is divided in three sections:
- Ticket Activation, where you are able to activate or view license information.
- App Settings where you are able to define Sweet Home functionality
- System Settings where you able to configure the systems, thus indicating the parameters of the systems to connect to, as well as selecting the graphics files.
Ticket Activation
Ticket Activation allows you to activate your ticket in the device.

Make sure you have an Internet connection available and complete the fields with:
- The ticket code you need to be activated
- The email address corresponding to your username for www.sweethomeforvantage.com
Click on “Activate Licence”
If the parameters are entered correctly, a message will inform you that the device has
been successfully registered, and the page will then indicate that the license has been successfully activated.
Note: only a single device can be associated to one ticket.
App Settings
On this page, you can configure all the application settings.
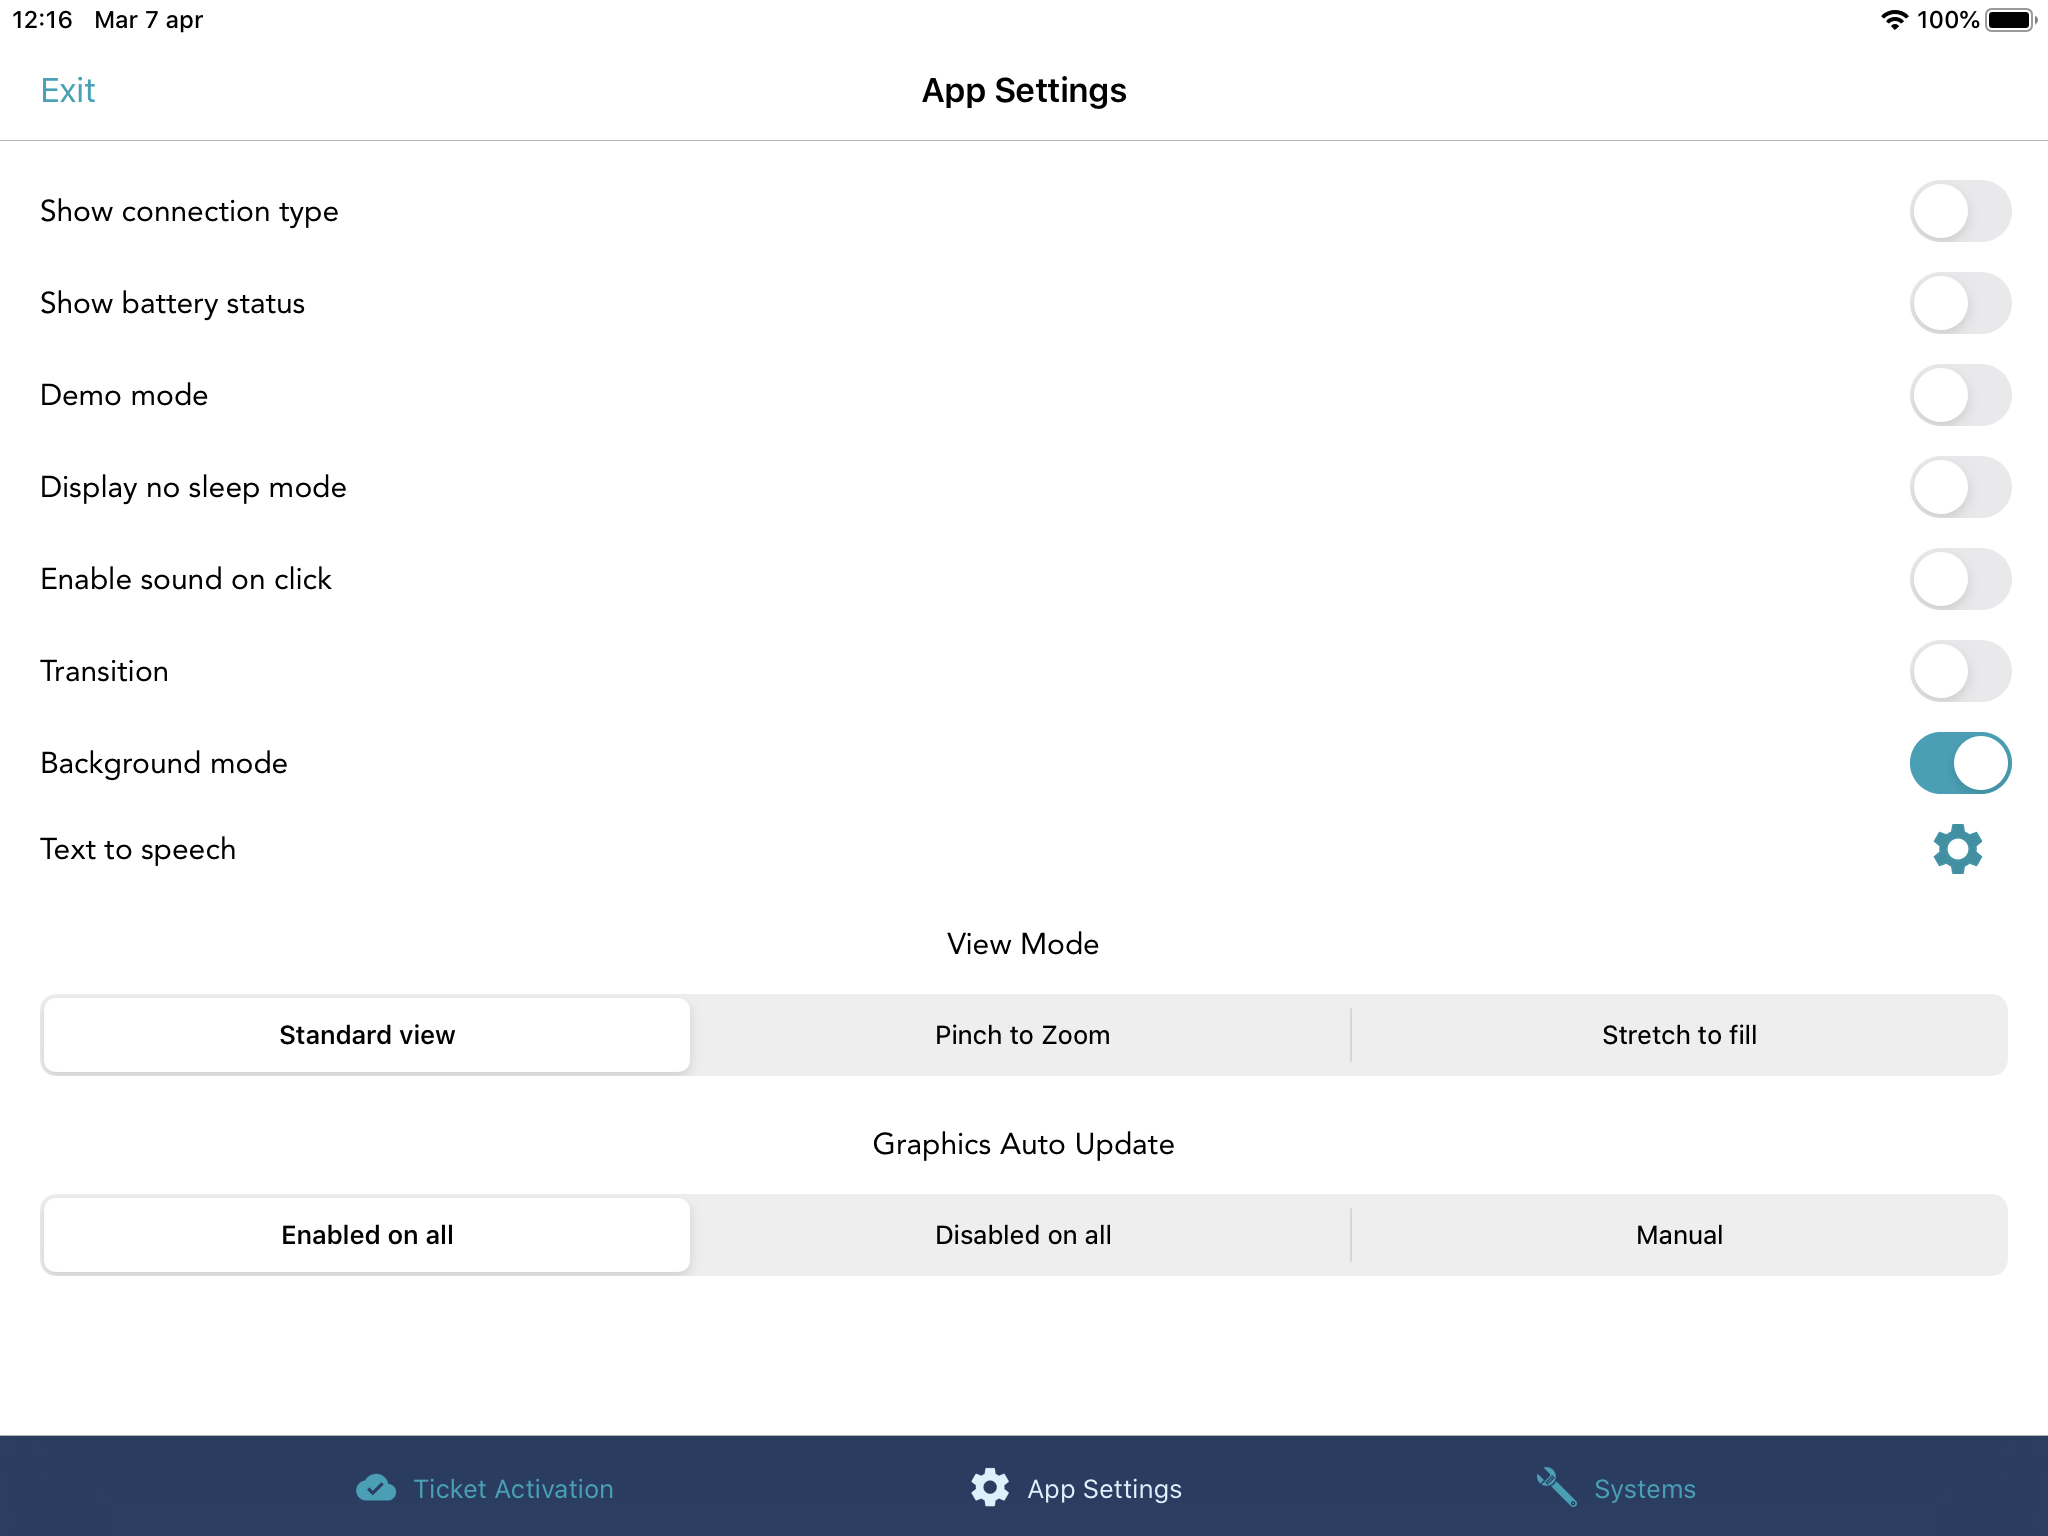
Show connection type:
When this switch is ON you will see an icon located on the bottom right of the screen for the communication interface.
This icon represents the connection status and its nature; indicating whether it is absent or whether you are connected via Wi-Fi or cellular network.
Show Battery Status:
Since the graphics cover the entire screen, this option will show an icon for the battery status.
Note: This is not available in Demo Mode.
Not available for TVOS
Demo Mode:
The Demo Mode disables the communication. This may be useful if you have already registered a device for communication and you want to display the look and feel of the interface without having any connection available. This mode simply turns off the communication, so you can easily navigate the interface without network error messages appearing.
Demo Mode may also be used when the licence is not yet activated.
Display No Sleep Mode
Enabling this option will prevent the normal device standby timeout and ensures that the application will remain open.
Enable Sound On Click:
When enabled the application will emit a click sound when a Vantage button is pressed.
View Mode:
- Standard View: shows Vantage TPT in standard mode.
- Pinch to Zoom: allows you to zoom in Vantage TPT view (Only for iOS).
- Stretch to fill Mode: this will enlarge the Vantage TPT view to fill the screen.
Graphics Auto Update:
- Enabled on all: graphics auto update is enabled on all systems
- Disabled on all: graphics auto update is disabled on all systems
- Manual: you can set this flag into each system configuration page
For more information about Graphics Auto Update, see here.
Transition:
Enables transition between Vantage TPT pages. (Available only for iOS,
soon available for Android)
Background mode:
Background mode keeps your system connected in background. This allows you to receive notifications regarding your system or doorbell calls in background. Only available on iOS.
Coming soon on Android.
Text To Speech
On/Off:
Use this to turn on/off Text To Speech.
Backgound:
If you turn on this setting Text To Speech will work even when the app is in background. Note that you
can activate this setting only if you previously activated the background mode for the whole app in App Settings.
Language:
Choose the language for Text To Speech.
System Configuration
These pages allow you to configure all your systems.
Note: The number of systems available depends on the type of your activated licence.
Sign in for more information about licence availabileity.

Choose the system to be configured:

On the System Configuration page, you are able to set all the configuration parameters for each system.
System Name
The name to appear over the system selection menu button when the Multi-System is implemented must be entered here.
Local IP/Local Port
In these fields enter the address and the port of the Vantage Controller, inside your local network. (Default port: 3001)
Remote URL/Remote Port:
In these fields enter the address and port to connect to when you are outside of the
local network that includes Vantage controller. This would typically be the public address of the remote router.
Graphics Auto Update :
If enabled, Sweet Home will automatically check if there is a new graphics file uploaded on Cloud available for that system. For more information see here.
Remember Last Page :
If this feature is enabled, the last page of a system shown before closing will be loaded on the next start-up of that system.
Security Check / Variable VID / Security Key:
The Security Check switch enables a control function that automatically checks whether the controller it is connected to is correct.
On System Start, Sweet Home checks if there is a variable with that Variable VID, which has a content equals to Security Key.
Select Graphics
The Select Graphics button enables you to import a graphics zip file from file manager.
This will allow you to choose a local file or one from a storage service on your device, such as Google Drive, Dropbox, iCloud and so on.
Delete Graphics
The Delete Graphics button enables you to delete the local graphics file so that the system will no longer be “configured” until another graphics file is loaded.
Download Graphics
The Download Graphics button enables you to download the last graphics file uploaded on the Sweet Home Cloud for that system.
Download Configuration
The Download Configuration button enables you to download the last configuration uploaded on the Sweet Home Cloud for that system.
Import graphics into the app
The interface can be fully developed within the Infusion Design Center environment
as follows:
- Prepare a Vantage Touch Screen interface with the "Touchscreen designer" tool on Generic TPT Vantage Objects.
- Export graphics files, a file called LcdConfig.xml and a folder containing the images will be generated.
- Compress the files after exporting. The files must be located in the root of zip archive. The zip file can be renamed to your own preference.
Prepare a Vantage Touch Screen
It is recommended that you use the Generic TPT touch screen, selecting 1024x768 resolution.
It is important to note that if you need to use the Set LCD Page procedure in your Design Center tasks, you have to inherit a TPT 1210 touch screen from Design Center 3.2.
How to export from Touchscreen Designer
Once you have designed your graphics into Touchscreen Designer, you can export it by clicking Design -> Export -> <Export Files...> and select a local directory to export all files needed. Thereafter in the destination folder you will find a configuration file named LcdConfig.xml and all the other graphics resources required.

Compress the files after exporting
In the local directory into which you have exported the graphics, compress all the files into zip format and rename the archive to suit your own preference.
Note: the LcdConfig.xml file and the Images folder must
be in the root of zip archive without subfolders.

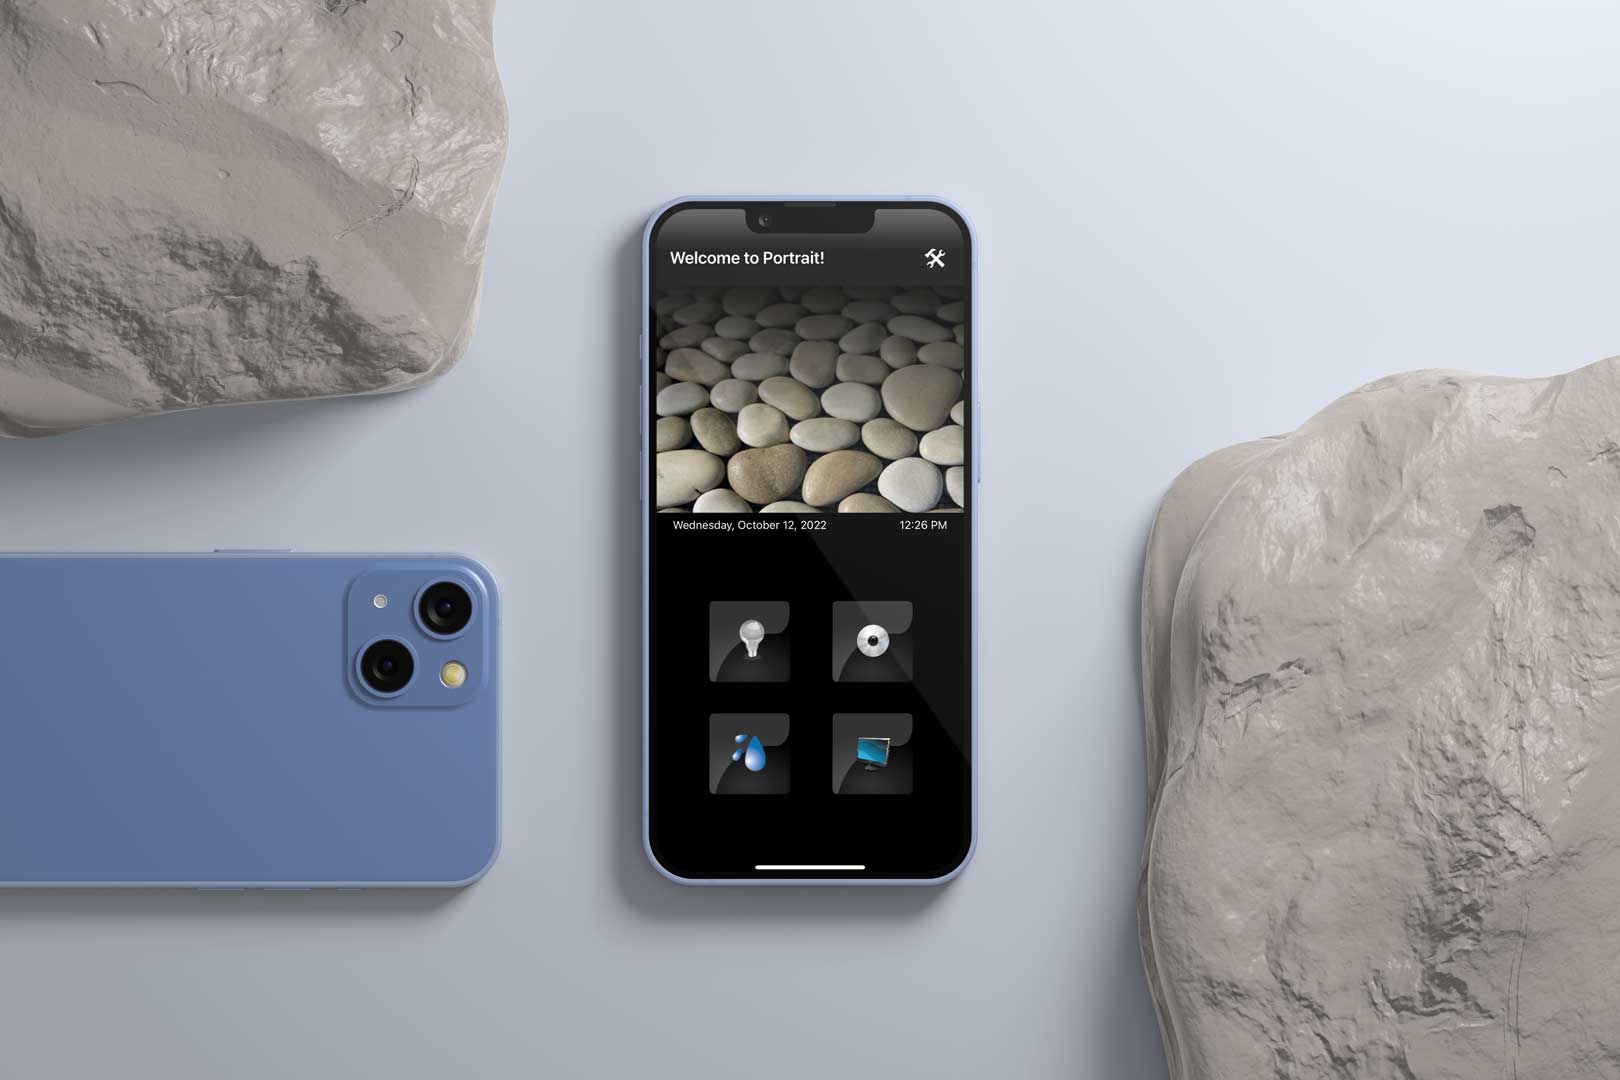
Portrait Feature
This feature allows you to design and run portrait graphics on the Sweet Home application.
Requirements:
- iOS app v5.5.9 or above / Not available yet on Android
Below, you can download the getting started resources for the Portrait Feature:
Download "Portrait Feature – Getting Started Resources"
Content:
- Sample DC File
- Sample Export ZIP File
- Touch Screen Graphics resources
To build a portrait graphics for sweet home, you will need to follow these steps:
1. Portrait Background Frame
Copy the content of the Touch Screen Graphics/Backgrounds folder on the following path of your machine:
C:\Program Files (x86)\Vantage\InFusion Design Center {version}\Touch Screen Graphics\Backgrounds
2. Touchscreen Design
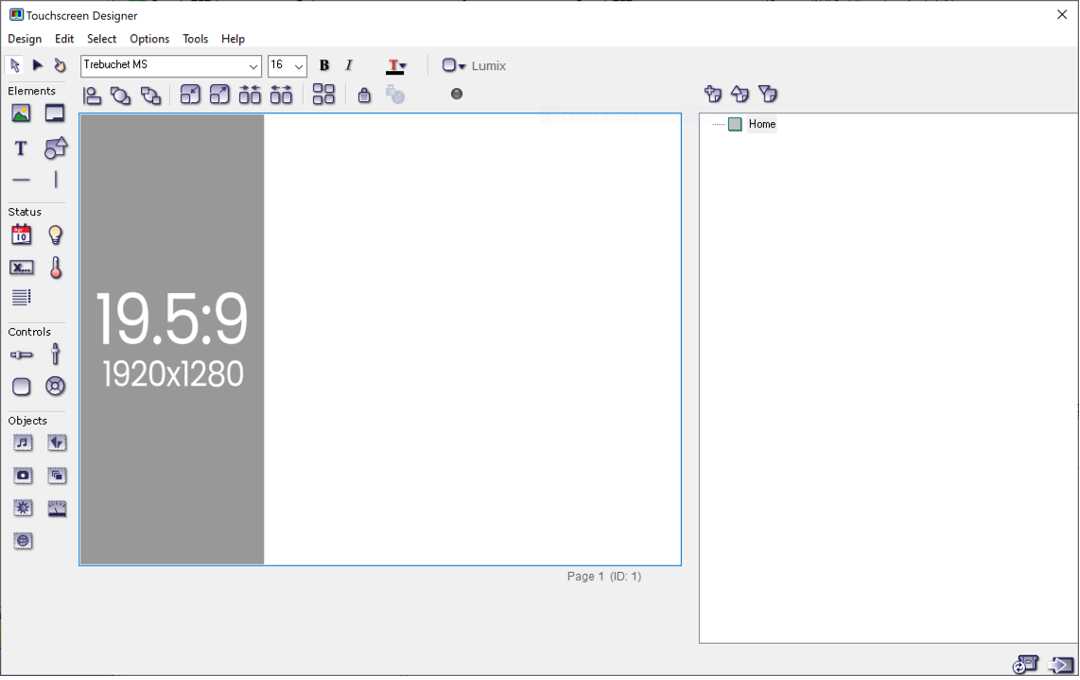
From the Vantage Objects tab, include the Touchscreens -> Generic TPT object on your project.
Select the new Generic TPT object, and on the bottom, select the 1920x1280 resolution.
Now, you can open the Touchscreen Designer, and select the 19.5:9 frame background imported with the step above.
From now on, you can build your graphics referring to the gray frame of the touchscreen background.
3. Touchscreen ZIP building
Once you have completed the Touchscreen design, you need to properly setup the export ZIP for portrait following this structure:
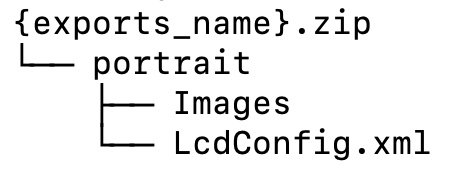
Once you have the ZIP file ready, you can set it for a Sweet Home system just like the landscape ZIP graphics files.
Import Locally
In Operator Mode, in the system configuration menu, you can locally upload the zip archive containing the graphics files by clicking on "SELECT GRAPHICS".
Not available for TVOS
.png)
The operating system file manager is used.
The Select Graphics button enables you to import a graphics zip file from the file
manager.
This will allow you to choose a local file or one from a storage service on your device, such as Google Drive, Dropbox, iCloud and so on.

Import from cloud
The "DOWNLOAD GRAPHICS" button allows you to download the last graphics file uploaded to the cCloud for that system.
The graphic file to be downloaded must be uploaded to the personal area www.sweethomeforvantage.com.
For more information see the Cloud Management section.
User interface
Once the application is configured, the Vantage view of the system configured in the
case of a single system will automatically be launched when the application is
started.
If the “Demo Mode” option is disabled, the interface tries to connect to the Vantage controller locally via Wi-Fi network, or remotely using the 3G/4G network or Wi-Fi. Once the connection parameters for the two modes are entered Sweet Home will operate the connection mode automatically, depending on the available connection. Priority is given to a Wi-Fi connection should one be available.
The application handles the connection and any network errors, alerting the user in the event of aany communication issue.
One system configured case
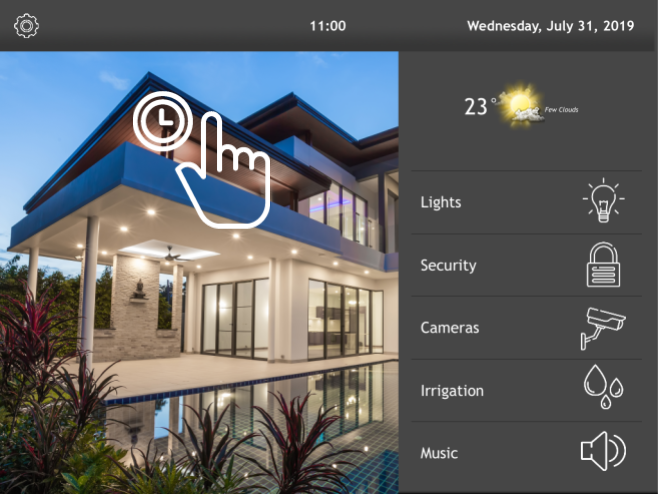
When the application starts, the Vantage view of the configured system will automatically be launched.
This view shows the Vantage TPT of a system configured on your application. To exit from this view and enter into Operator Mode simply press down anywhere on the screen for 6 seconds.
Multiple system configured case
Depending on the type of license purchased, more than one Vantage system may be configured.
If you have more than one system configured ...meaning that you have loaded the graphics file for those systems… the screen for choosing the systems will be shown as below:

On the bottom bar click on the particular system that you wish to view.
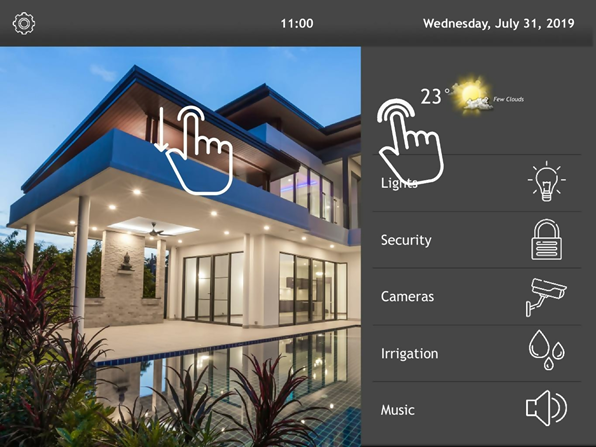
If you have more than four systems configured, the bottom bar will display only the last four systems used in the order last used. To show the other configured systems, swipe down or click on the top-right icon.
The following images illustrate this option.


To enter Operator Mode, from the Systems Selection view, perform a horizontal swipe. Alternatively, hold for 6 seconds anywhere on the screen.
In the more than one system case, to exit Vantage View and return to the System Selection, you can either press down anywhere on the screen for 6 seconds or simply swipe down anywhere on the screen.
Customizable object
You may insert all items except the following ones of "Touch Screen Designer":
- Music component
- Vantage system control component
- Pictures component
Sweet Home allows you to expand the functionality provided by the Touch Screen Designer, going to explicit particular configuration parameters.
IP Camera
You may use the Video Camera Component to view images transmitted from one or more IP cameras.
The system is designed to not limit the use of cameras to the few available in Touch
Screen Designer, but to expand the use to any camera that is viewable in a web browser as well as video camera components supported by Real Time Streaming Protocol (RTSP). RTSP allows you to display IP-camera streams with several codecs (e.g. h264, h265).
In addition, in the configuration you may enter two addresses for each camera, the first for the local connection and the second for the remote connection. The application will choose from time to time which to use, depending on whether you are in a local or remote connection with the controller.
To set up a video camera insert the following parameters into the configuration panel within the Touch Screen Designers:
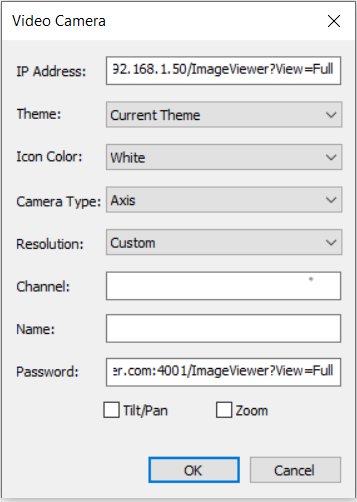
Enter the local address to contact the camera including all necessary parameters
For example: http://192.168.1.50/ImageViewer?View=Ful (*)
Password Field:
Enter the remote address to contact the camera including all necessary parameters:
For example: http://myserver.dyndns-server.com:4001/ImageViewer?View=Full (*)
Camera Type Field:
To use PTZ functionalities, select Axis or Panasonic depending on the camera brand you are using.
PTZ is enabled only for Axis and Panasonic cameras the other fields hasve no functionality.
Resolution:
If you choose “custom”, you can stretch the camera component make it the size you require inside the touch screen.
(*) See your IP camera manual for information about parameters to be included (such as username, passwords, etc.) Feel free to contact support@sweethomeforvantage.com if you need help with contact strings
CGI Commands:
CGI commands may be sent to your devices. Using this feature, you are able to create custom transparent buttons to control objects designed to be managed with a CGI interface.
For example, you may handle an IP camera PTZ system or enable/disable its IR illuminator by simply referring to the list of commands and parameters available from the manufacturer.
For commands, refer to manuals or the manufacturer's technical support of the object to be controlled.
To use this feature complete the following steps:
- Insert a "Camera View" object with Touch Screen Designer.
- Set the resolution to "Custom" in order to adjust the size of the button to your liking.
- Insert the string "cgicommand" in the "Channel" field.
- Enter the cgi command string with local address in the "IP Address.”
- Enter the cgi command string with remote address into the "Password.”
To enable sending the CGI string must have the following format:
http://user:password@address:port/command
Web widget
The Web Widget function enables web content to be displayed on a Vantage touchscreen.
You will be able to integrate simple web pages or embed more complex web dynamic widgets into your graphics.
Vantage Touchscreen Designer no longer supports web content elements, and the method now used to insert a web widget into touchscreen designer is as follows:
- Create a Button
- Input the XML element "webobject" into the first line of the Text field
XML format:
Element: webobject
Attributes: clickable: true to enable the user interaction.
transparent: true to set the background of the web object to transparent.
<webobject url="{url}" clickable="{true|false}" transparent="{ true|false }" />
Examples:
<webobject url="http://www.google.com" />
<webobject url="http://www.google.com" clickable="false" transparent="true" />
<webobject url="http://www.google.com" clickable="false" />
<webobject url="http://www.google.com" transparent ="true" />
Note:
It is most important to write the protocol (e.g. http://, or https://) for the URL attribute.
Clickable and transparent attributes are optional, but default clickable is true and default transparent is false.
The following image shows where to input the XML text for the button:
.png)
Notifications
The new Notification feature allows you to send notifications to iOS and Android devices with a valid Sweet Home active license.
Notifications work even if the device is not connected to the Vantage Infusion controller.
Requirements:
- Vantage Infusion Controller: IC DIN II or IC DIN II Lite
- Design Center version 3.9 or above
- iOS app v5.5.9 or above / Android app v5.0.5 or above
- Vantage Infusion controller with an internet connection (check the IP gateway)
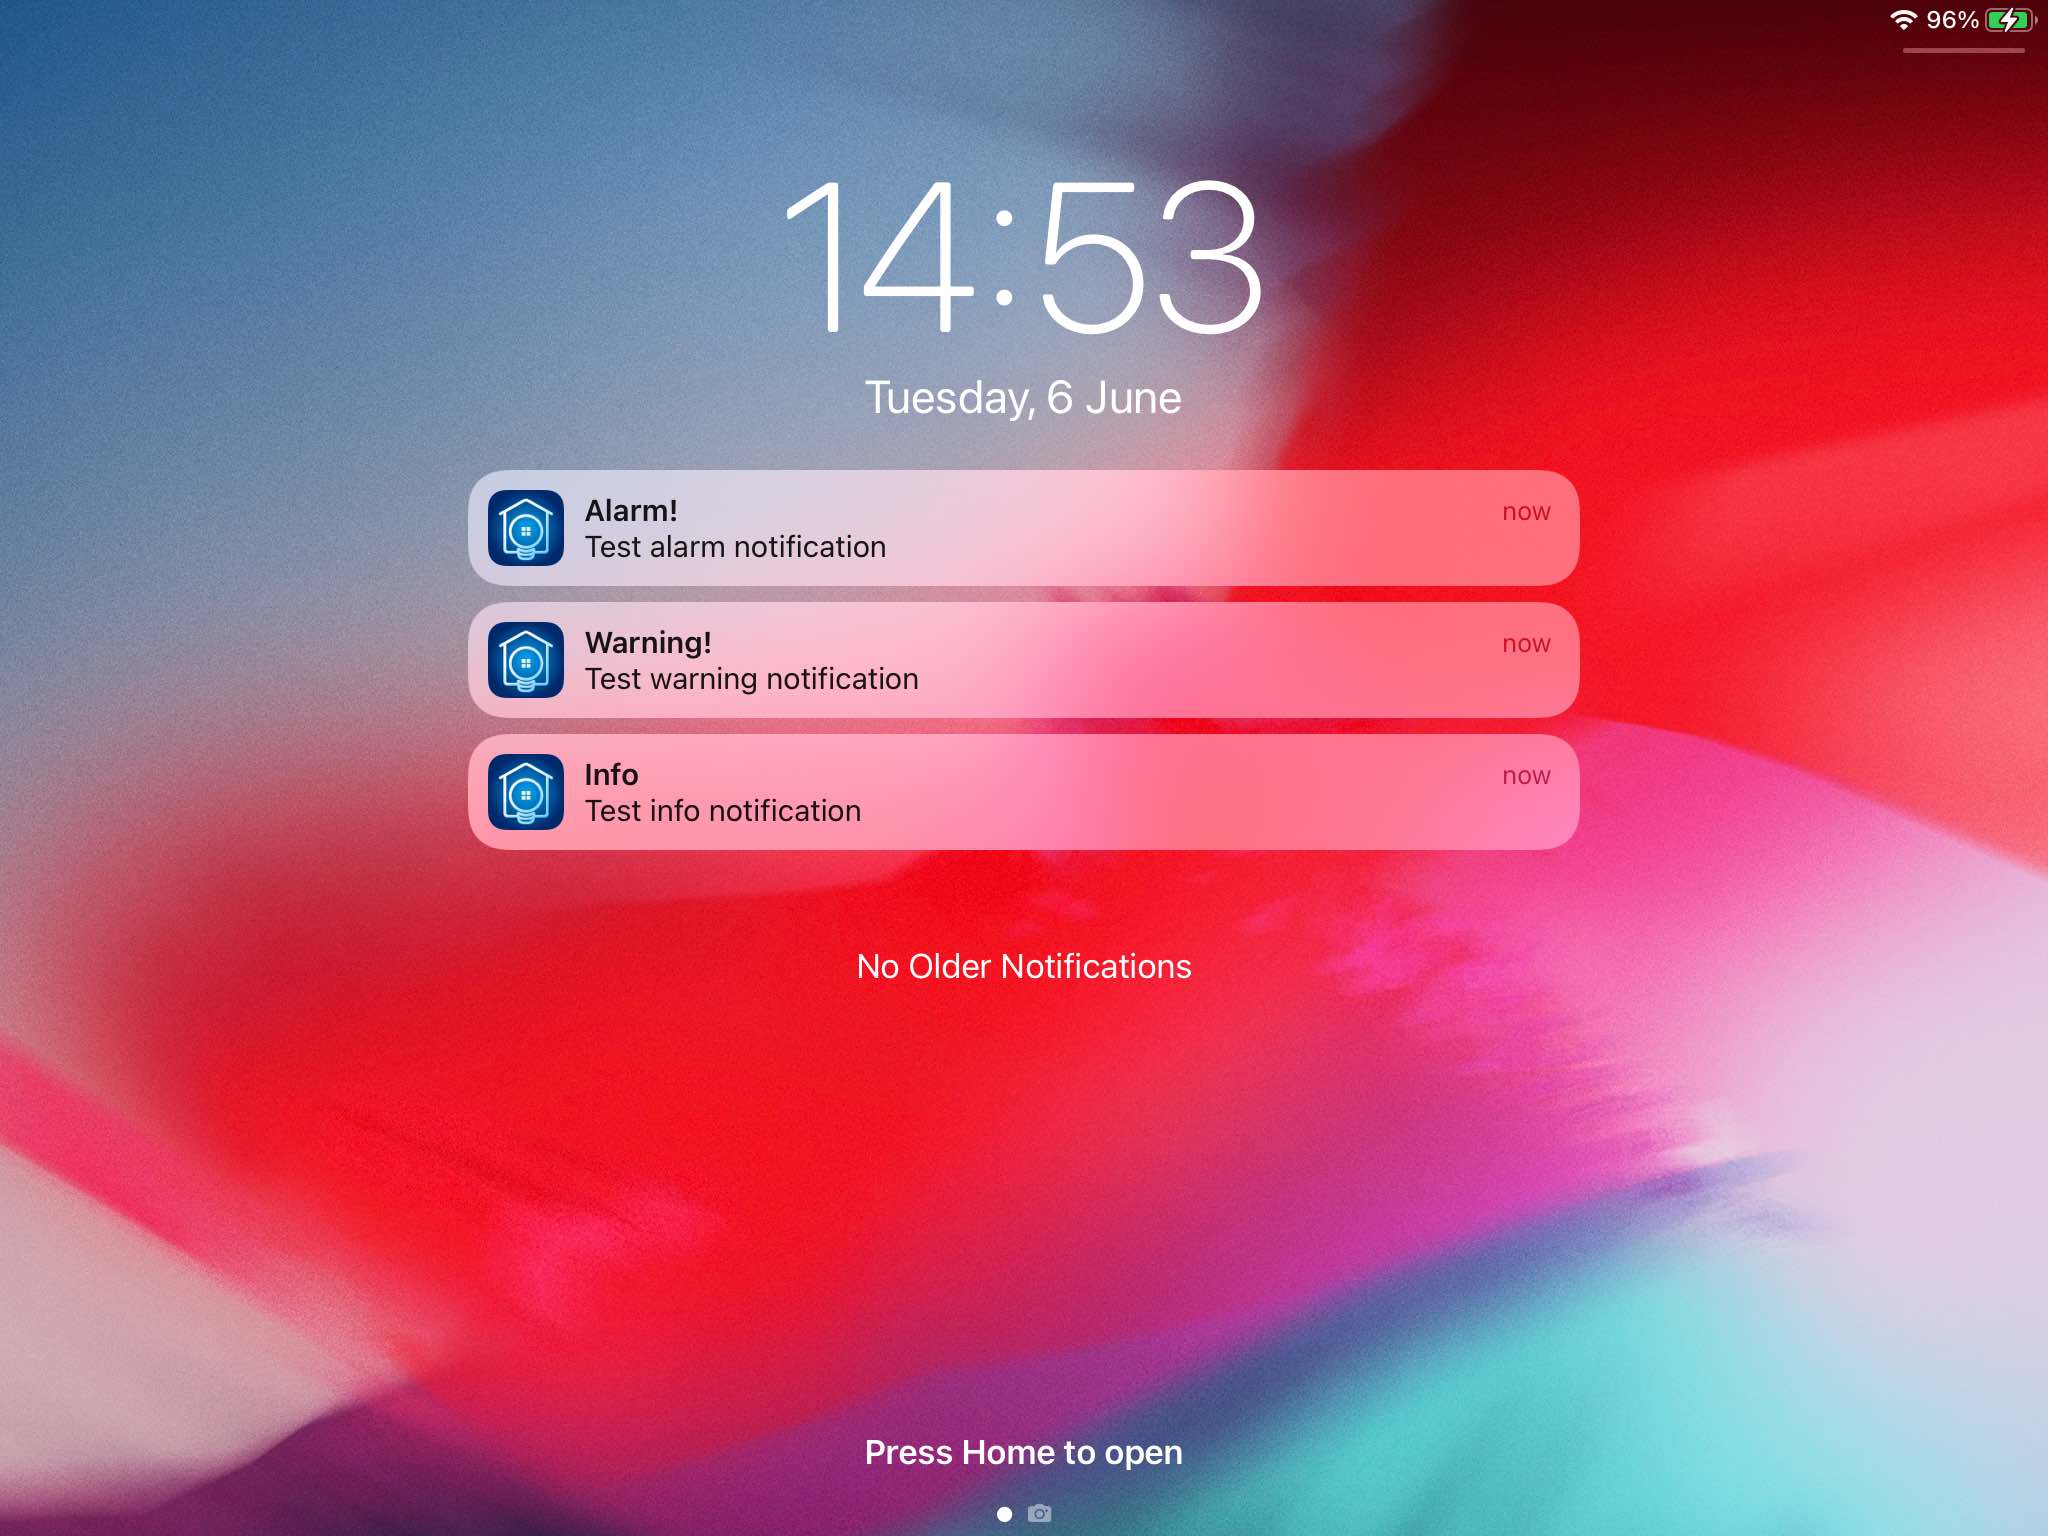
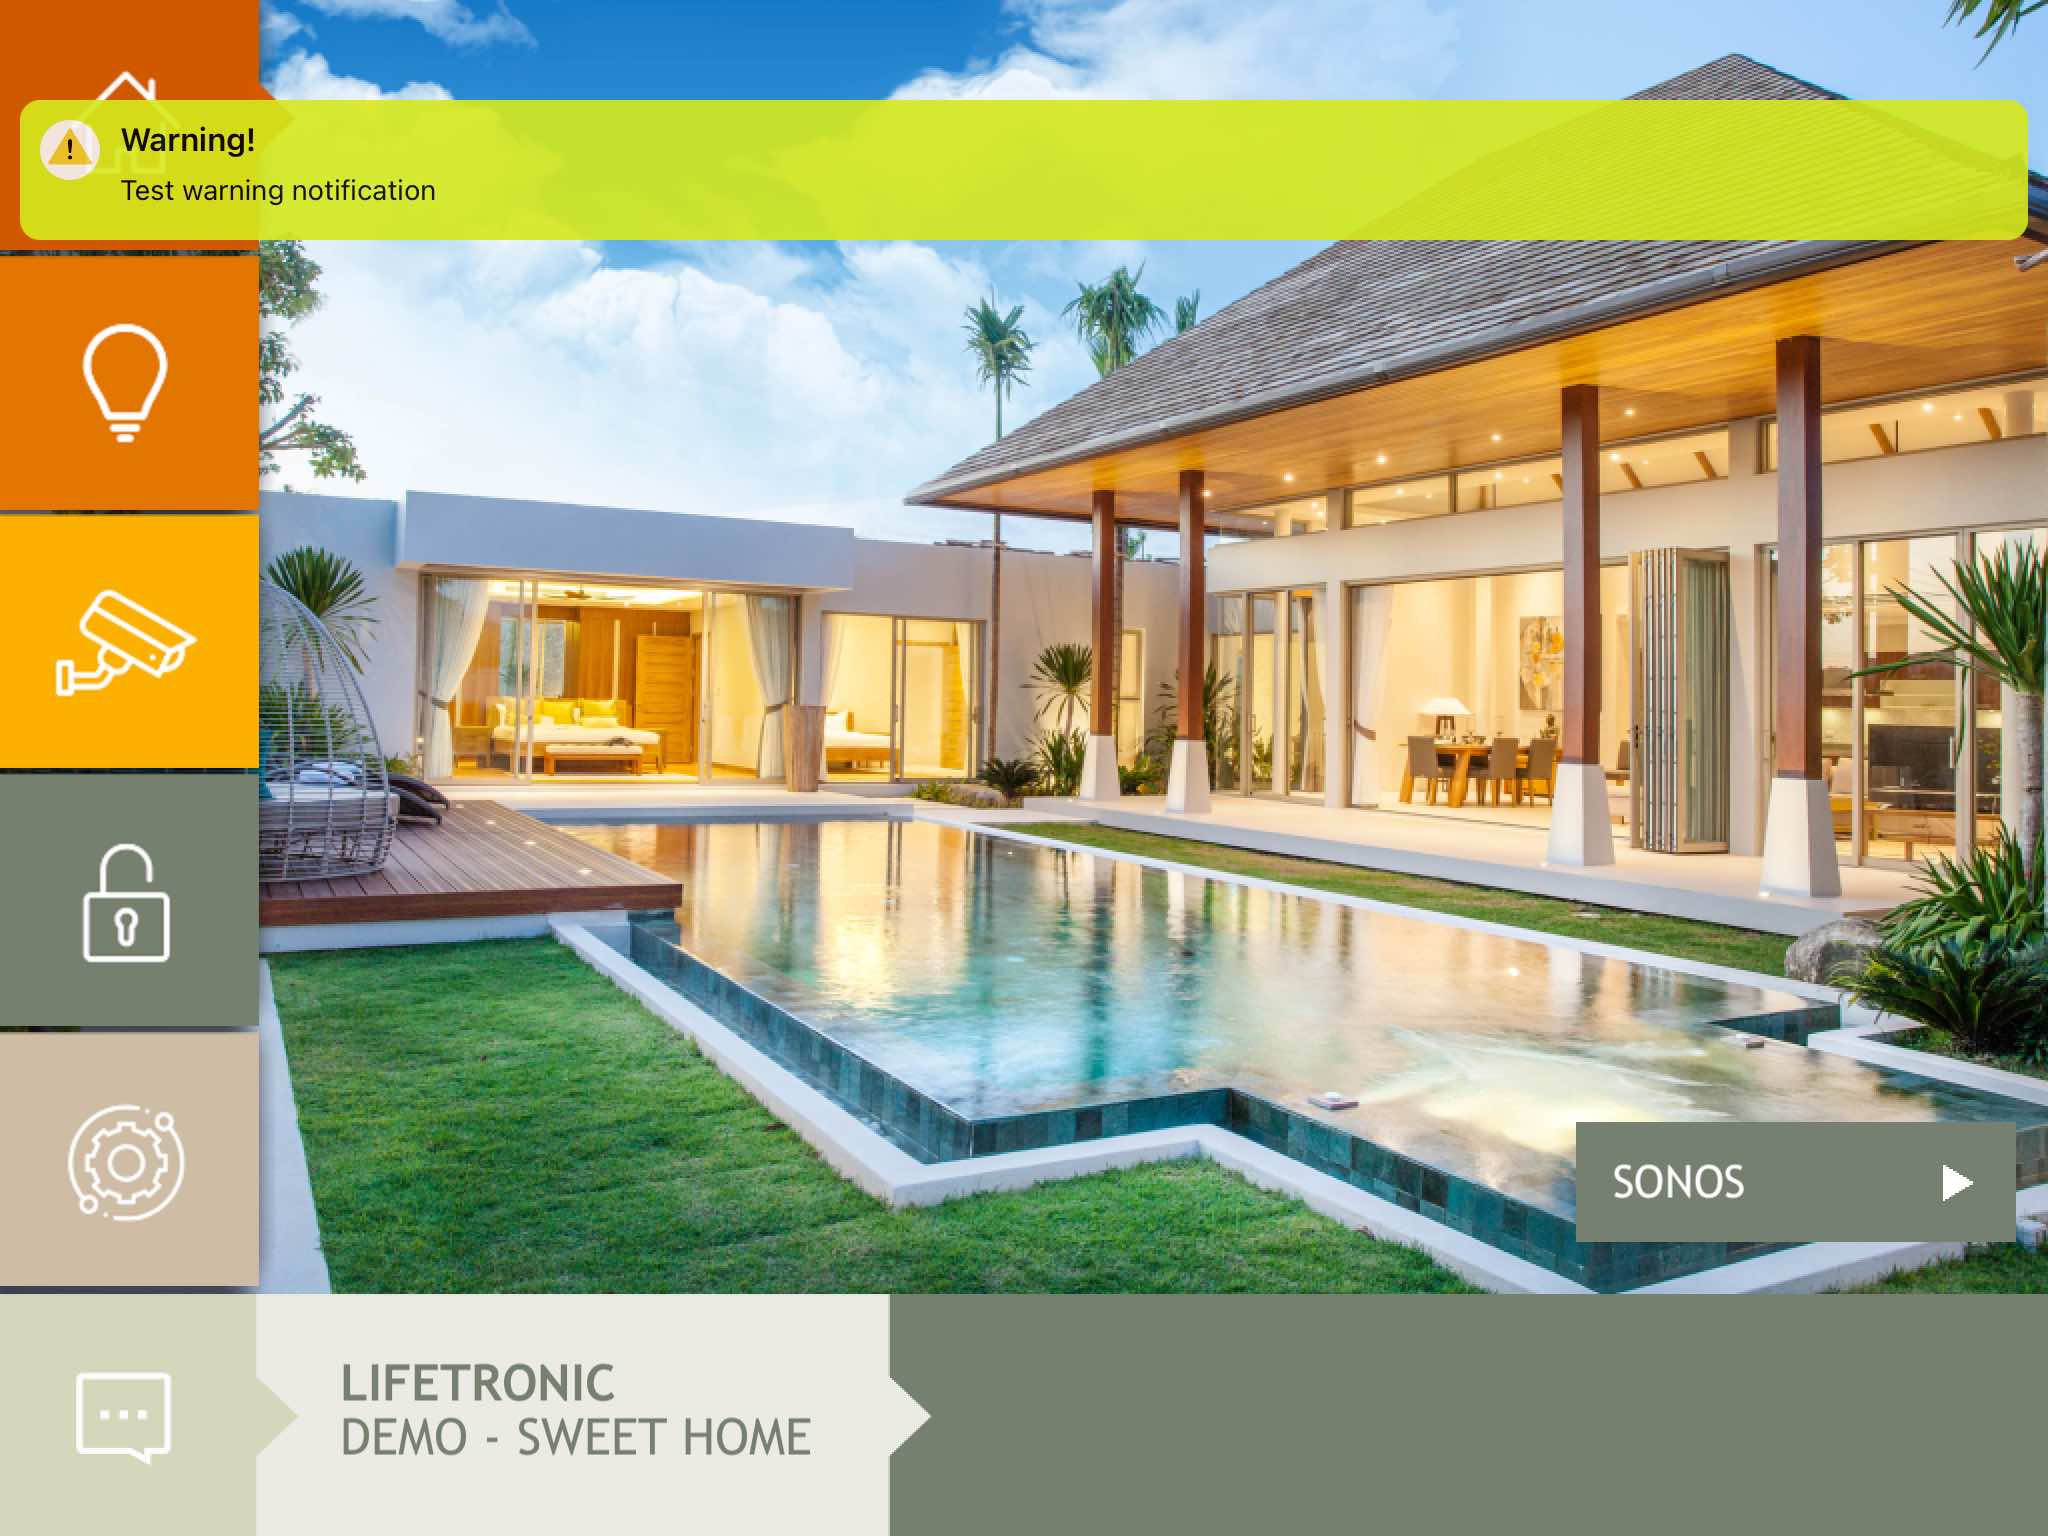
If you want to use this feature, you need to follow these steps:
#1 Configure the SH5SendNotification driver
Download the latest version of the Vantage online driver "SH5SendNotification" on the Design center (search in the online driver by Manufacturer: Lifetronic)
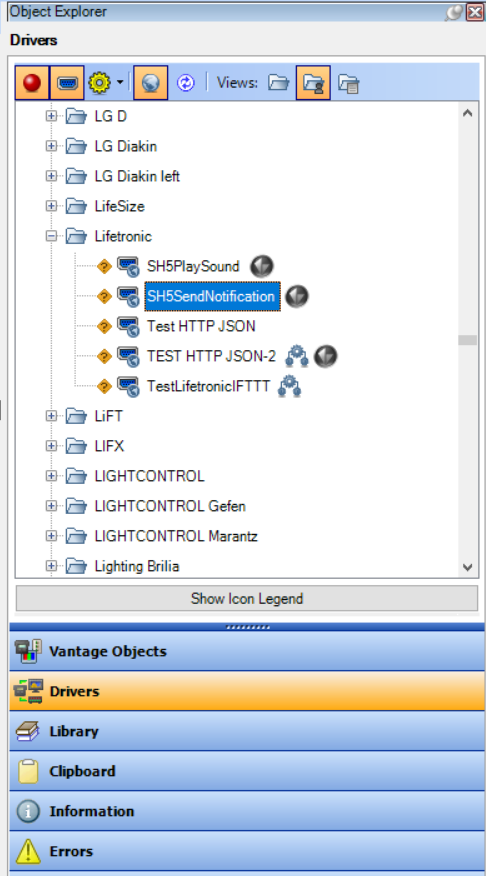
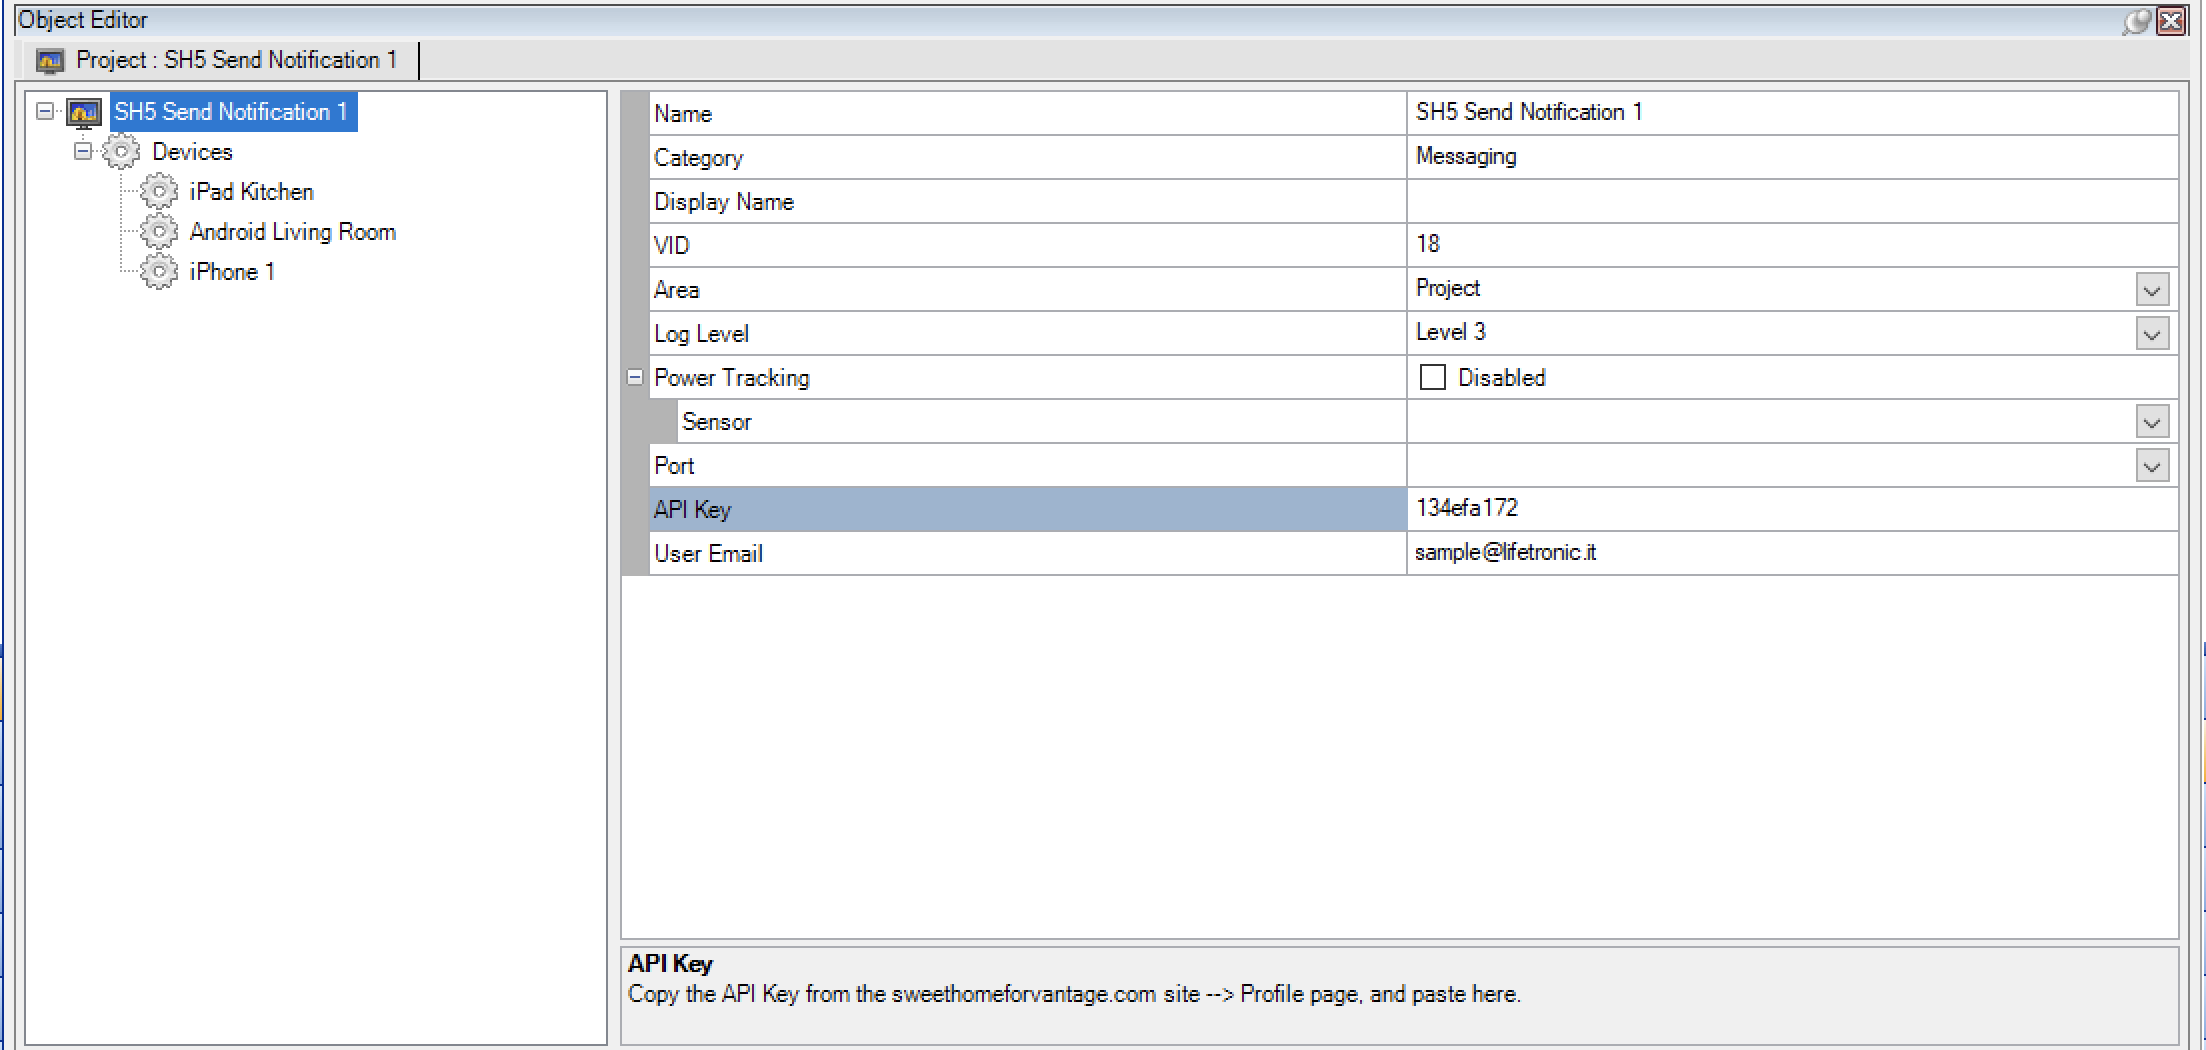
Select the driver parent object and set the following fields:
“API key”: Log in and generate the API key on the Profile page.
“User Email”: Sweet Home site account's email for the field.
Click on "Devices", then "Add a Device" to add a new iOS/Android device to notify.
Click on the device child object, then enter the ticket for the field "Ticket".
#2 Create a task for sending a notification
Create a new task and select the "Send" procedure.
Then, select the SH5 Send Notification driver as "SMS Device".
For the "Phone Number" field, enter one of the following values (without quotes): "info", "warning", "alarm".
For the "Message" field, enter the notification's message.

To test the Task, connect to the Vantage Infusion controller, program, and click "Test" for the new created Task.
Text To Speech
Text To Speech is a useful feature that allows Sweet Home to read your System’s Notifications.
When a notification is coming from Vantage your device will speak and read the notification message after the notification’s sound.
Text To Speech is very easy to configure: All you need to do is tapping the gear icon next to Text To Speech in App Settings. Then you can activate it by tapping the On/Off switch.
When you set it to On, two new settings will be shown: Background and Language.
Setting the Background switch to On will make Text To Speech read your system’s notifications even when the app is in background. Note that you can set this setting to On only if you previously enabled the background mode for the whole app In App Settings.
You can finally choose up to 34 languages to work with Text To Speech.
Be aware that your notifications must be wrote in the correct language from Vantage Design Center in order to have a clear and correct pronunciation. (Only for IOS, soon on Android )
Video Doorbell
The Video Doorbell integration allows you to receive calls when someone ringing to your bell, so you can answer it and:
- View the video SIP stream.
- Talk to the other person through your device microphone and speakers.
- Unlock your door by launching a Task
- Turn on the lights by launching a Task

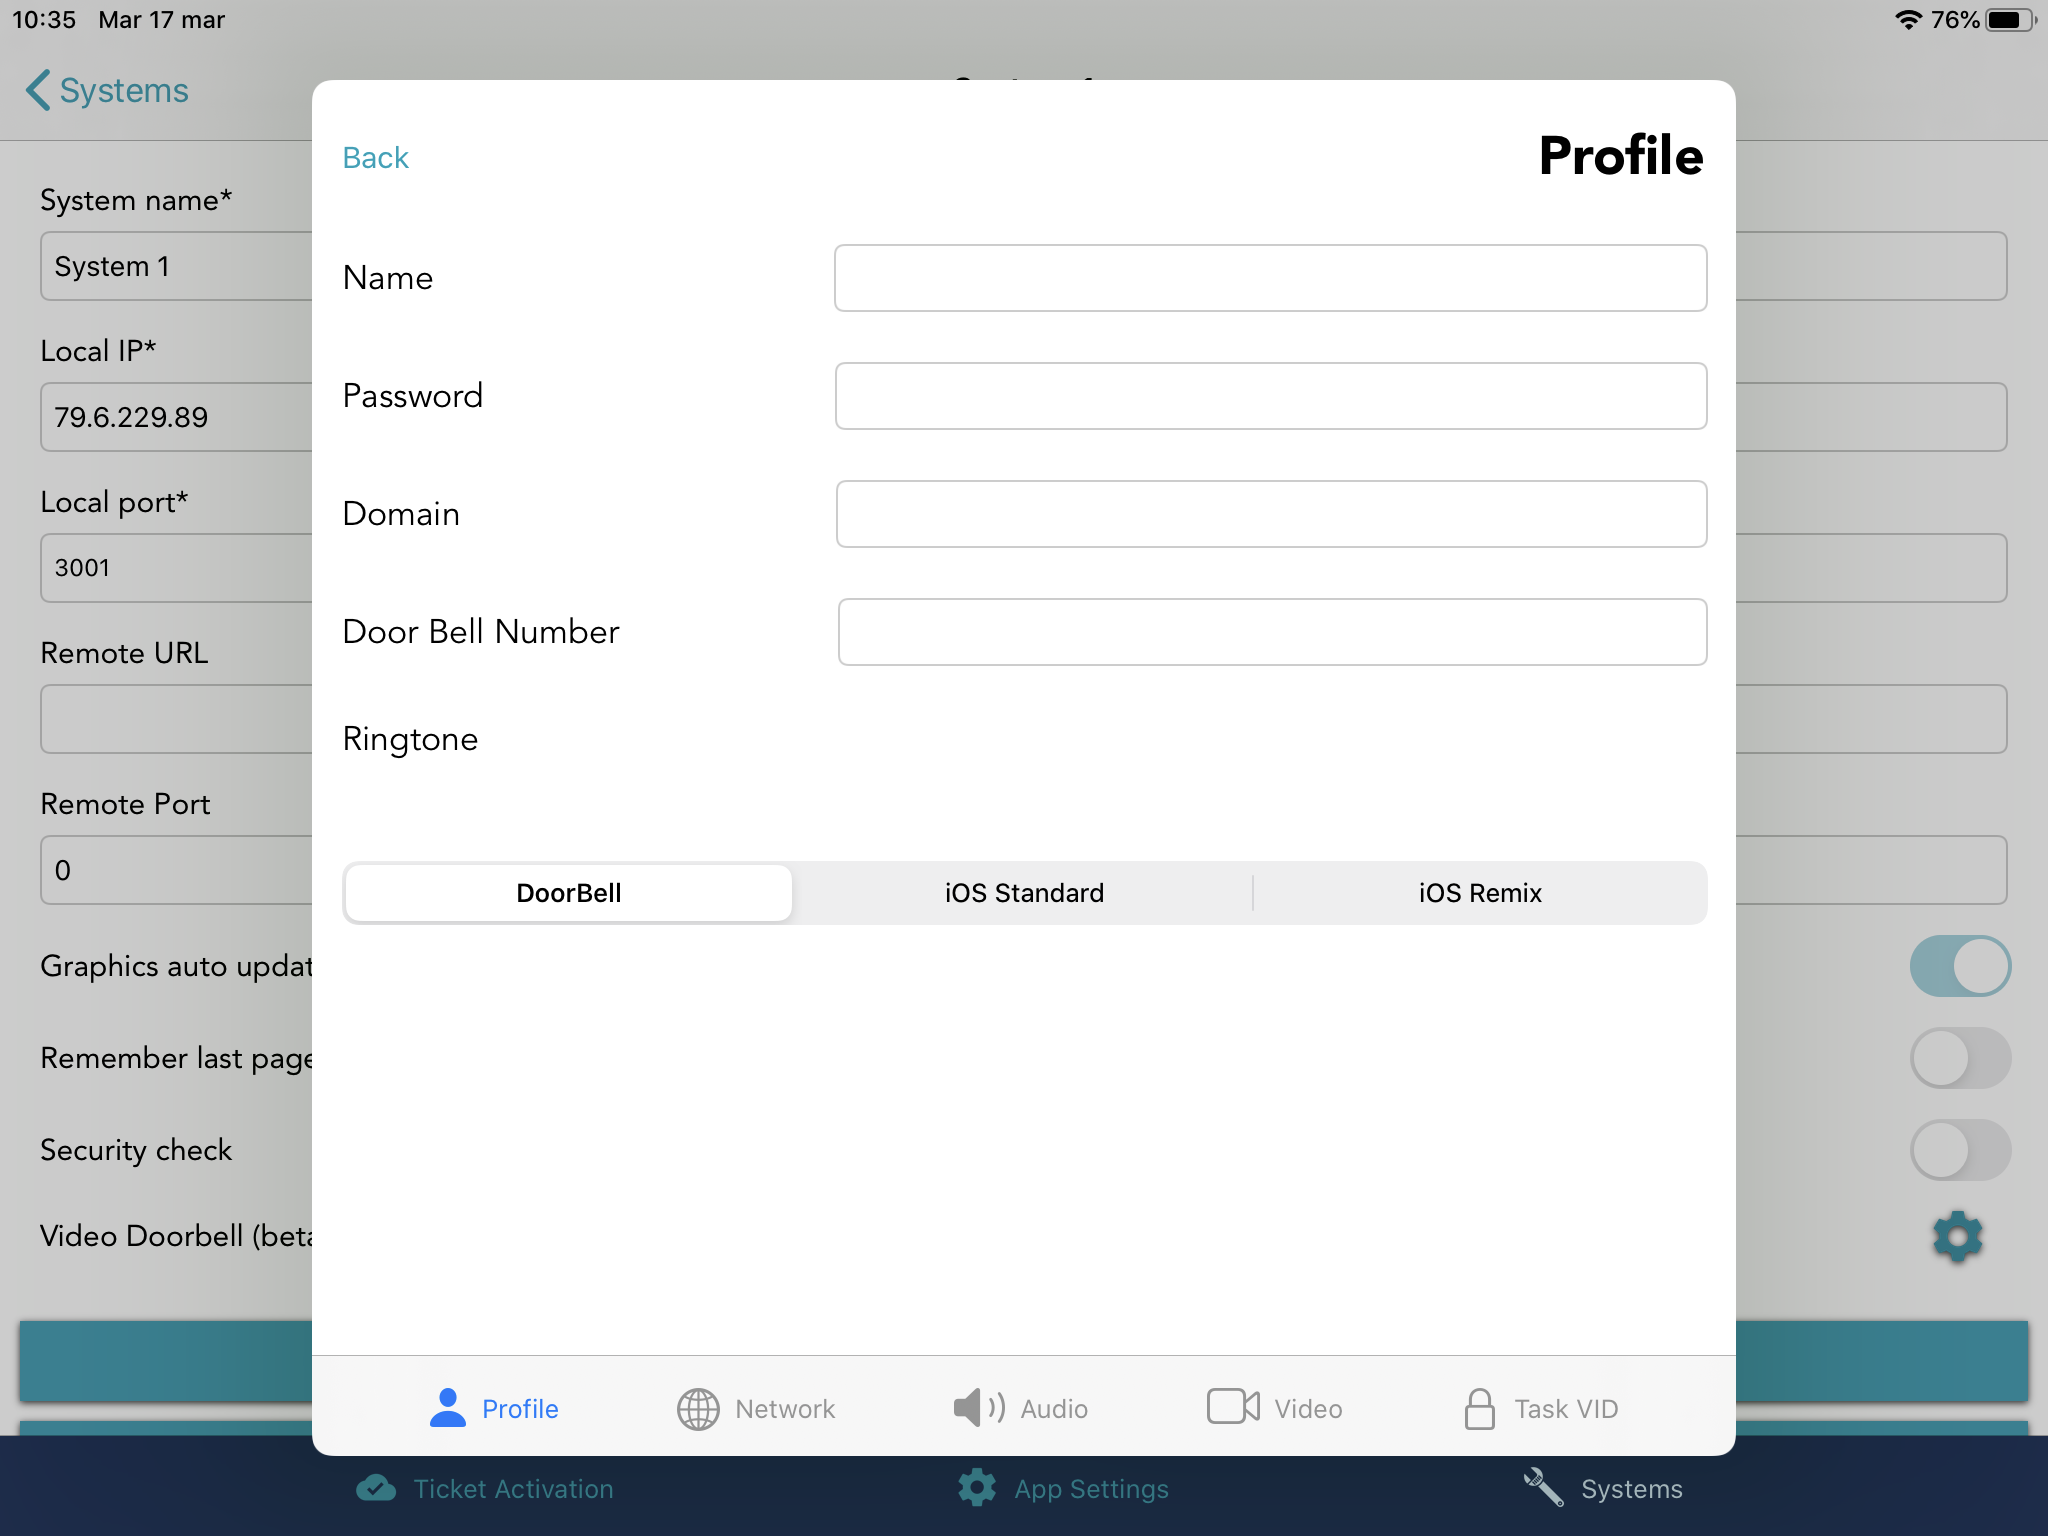
You can configure your SIP Doorbell into the system configuration page by clicking on the gear icon beside "Video Doorbell".
The Doorbell configuration is divided in 5 pages: Profile, Network, Audio, Video and Task VID.
Profile
The profile page allows you to set up your SIP account and Door Bell Number. It also let you choose a ringtone.
The Name, Password, Domain and Door Bell Number fields must be filled in order to complete your SIP configuration correctly. If you don’t fill these fields the SIP Account won’t be saved.
Name:
Here you have to type your SIP Account Name.
Password:
Here you have to type your SIP Account Password. We don’t have access to your password.
Domain:
Here you have to type your SIP Account Domain. For instance sip.antisip.com.
Door Bell Number:
Here you have to type the Account Number for the SIP Doorbell to call.
Ringtone:
Here you can hear and choose a ringtone for when you get called by the SIP Doorbell.
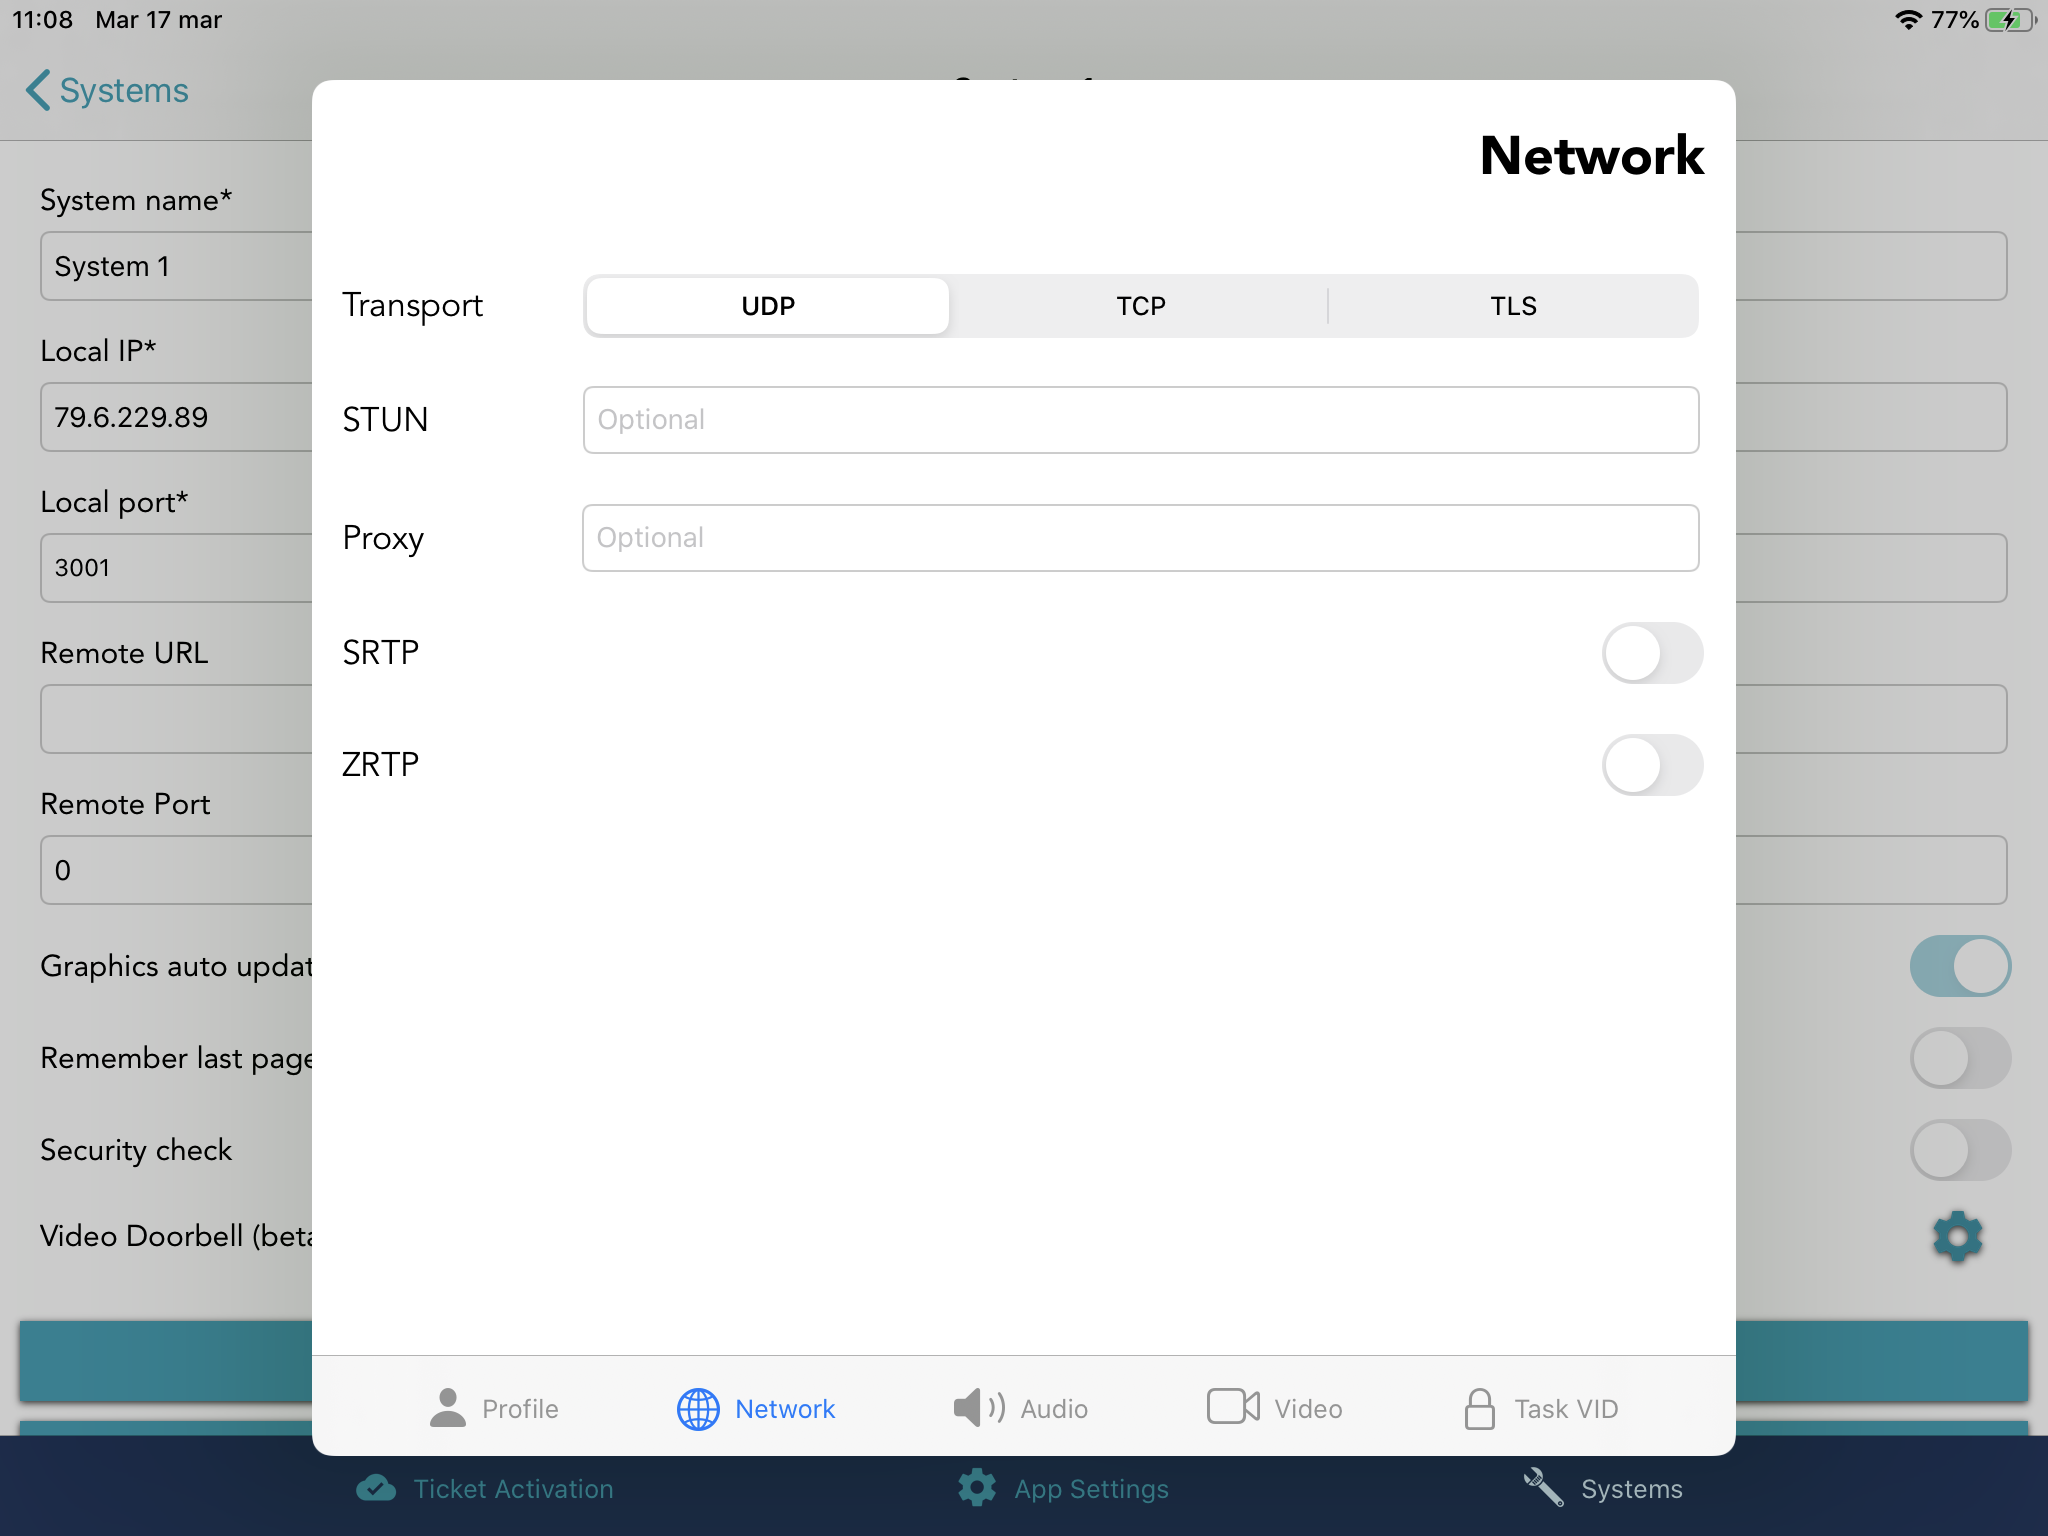
Network:
Here you can set up your network preferences such as the preferred type of Transport. You can also enable settings such as SRTP or ZRTP.
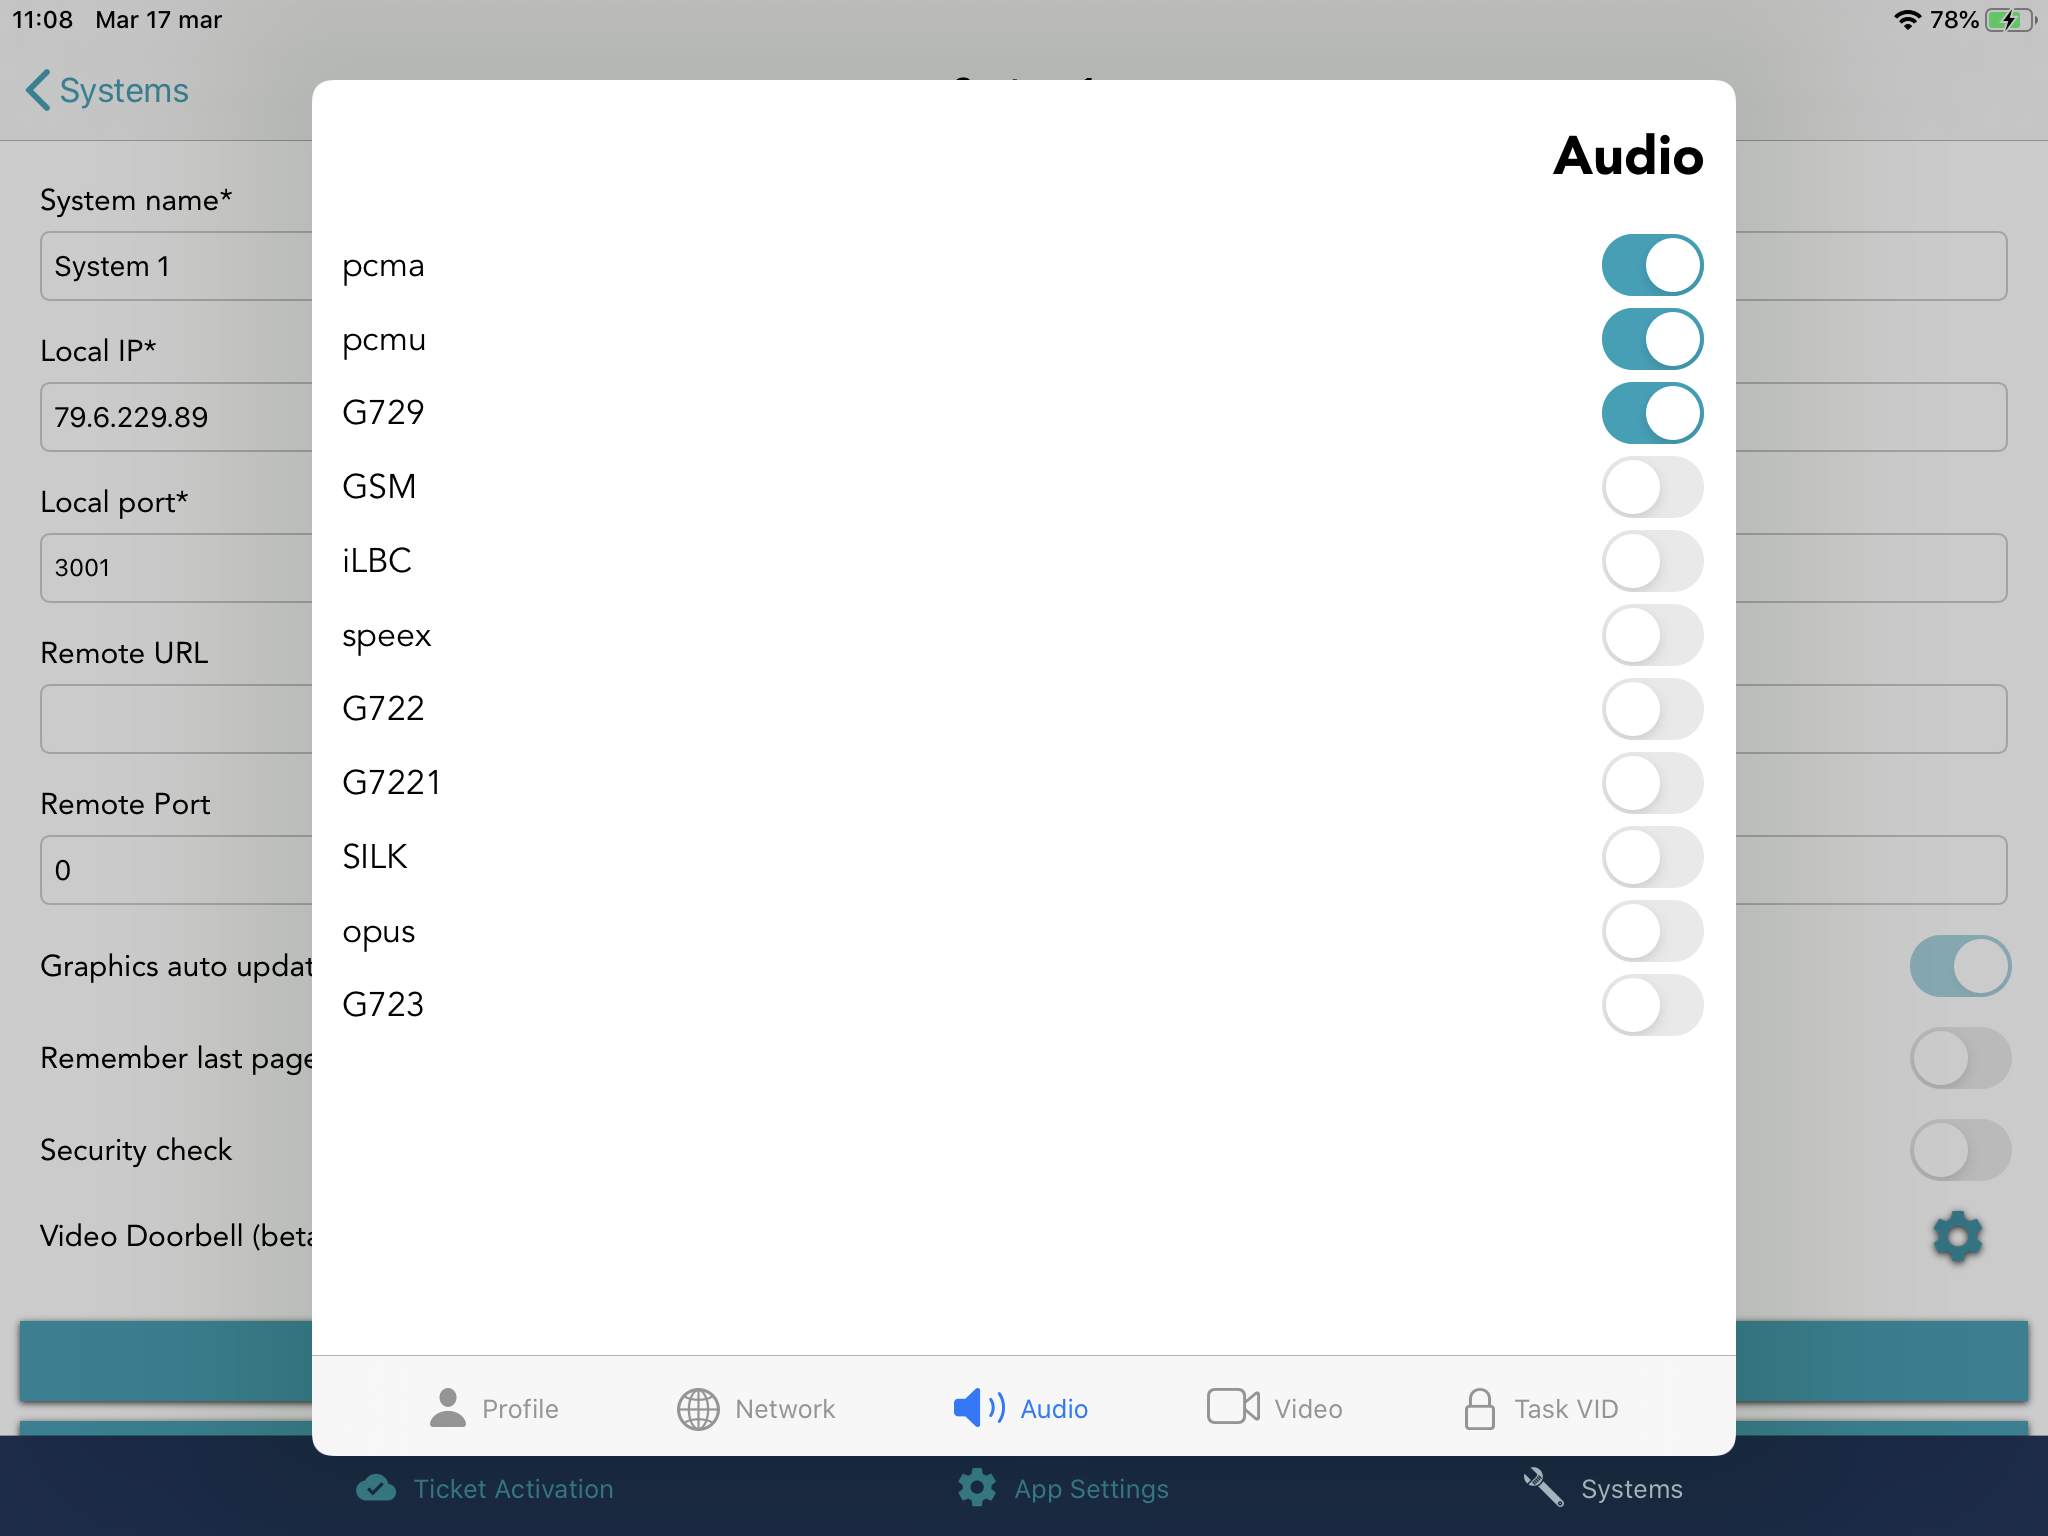
Audio
Here you set up your Audio preferences such as pcma, pcmu.
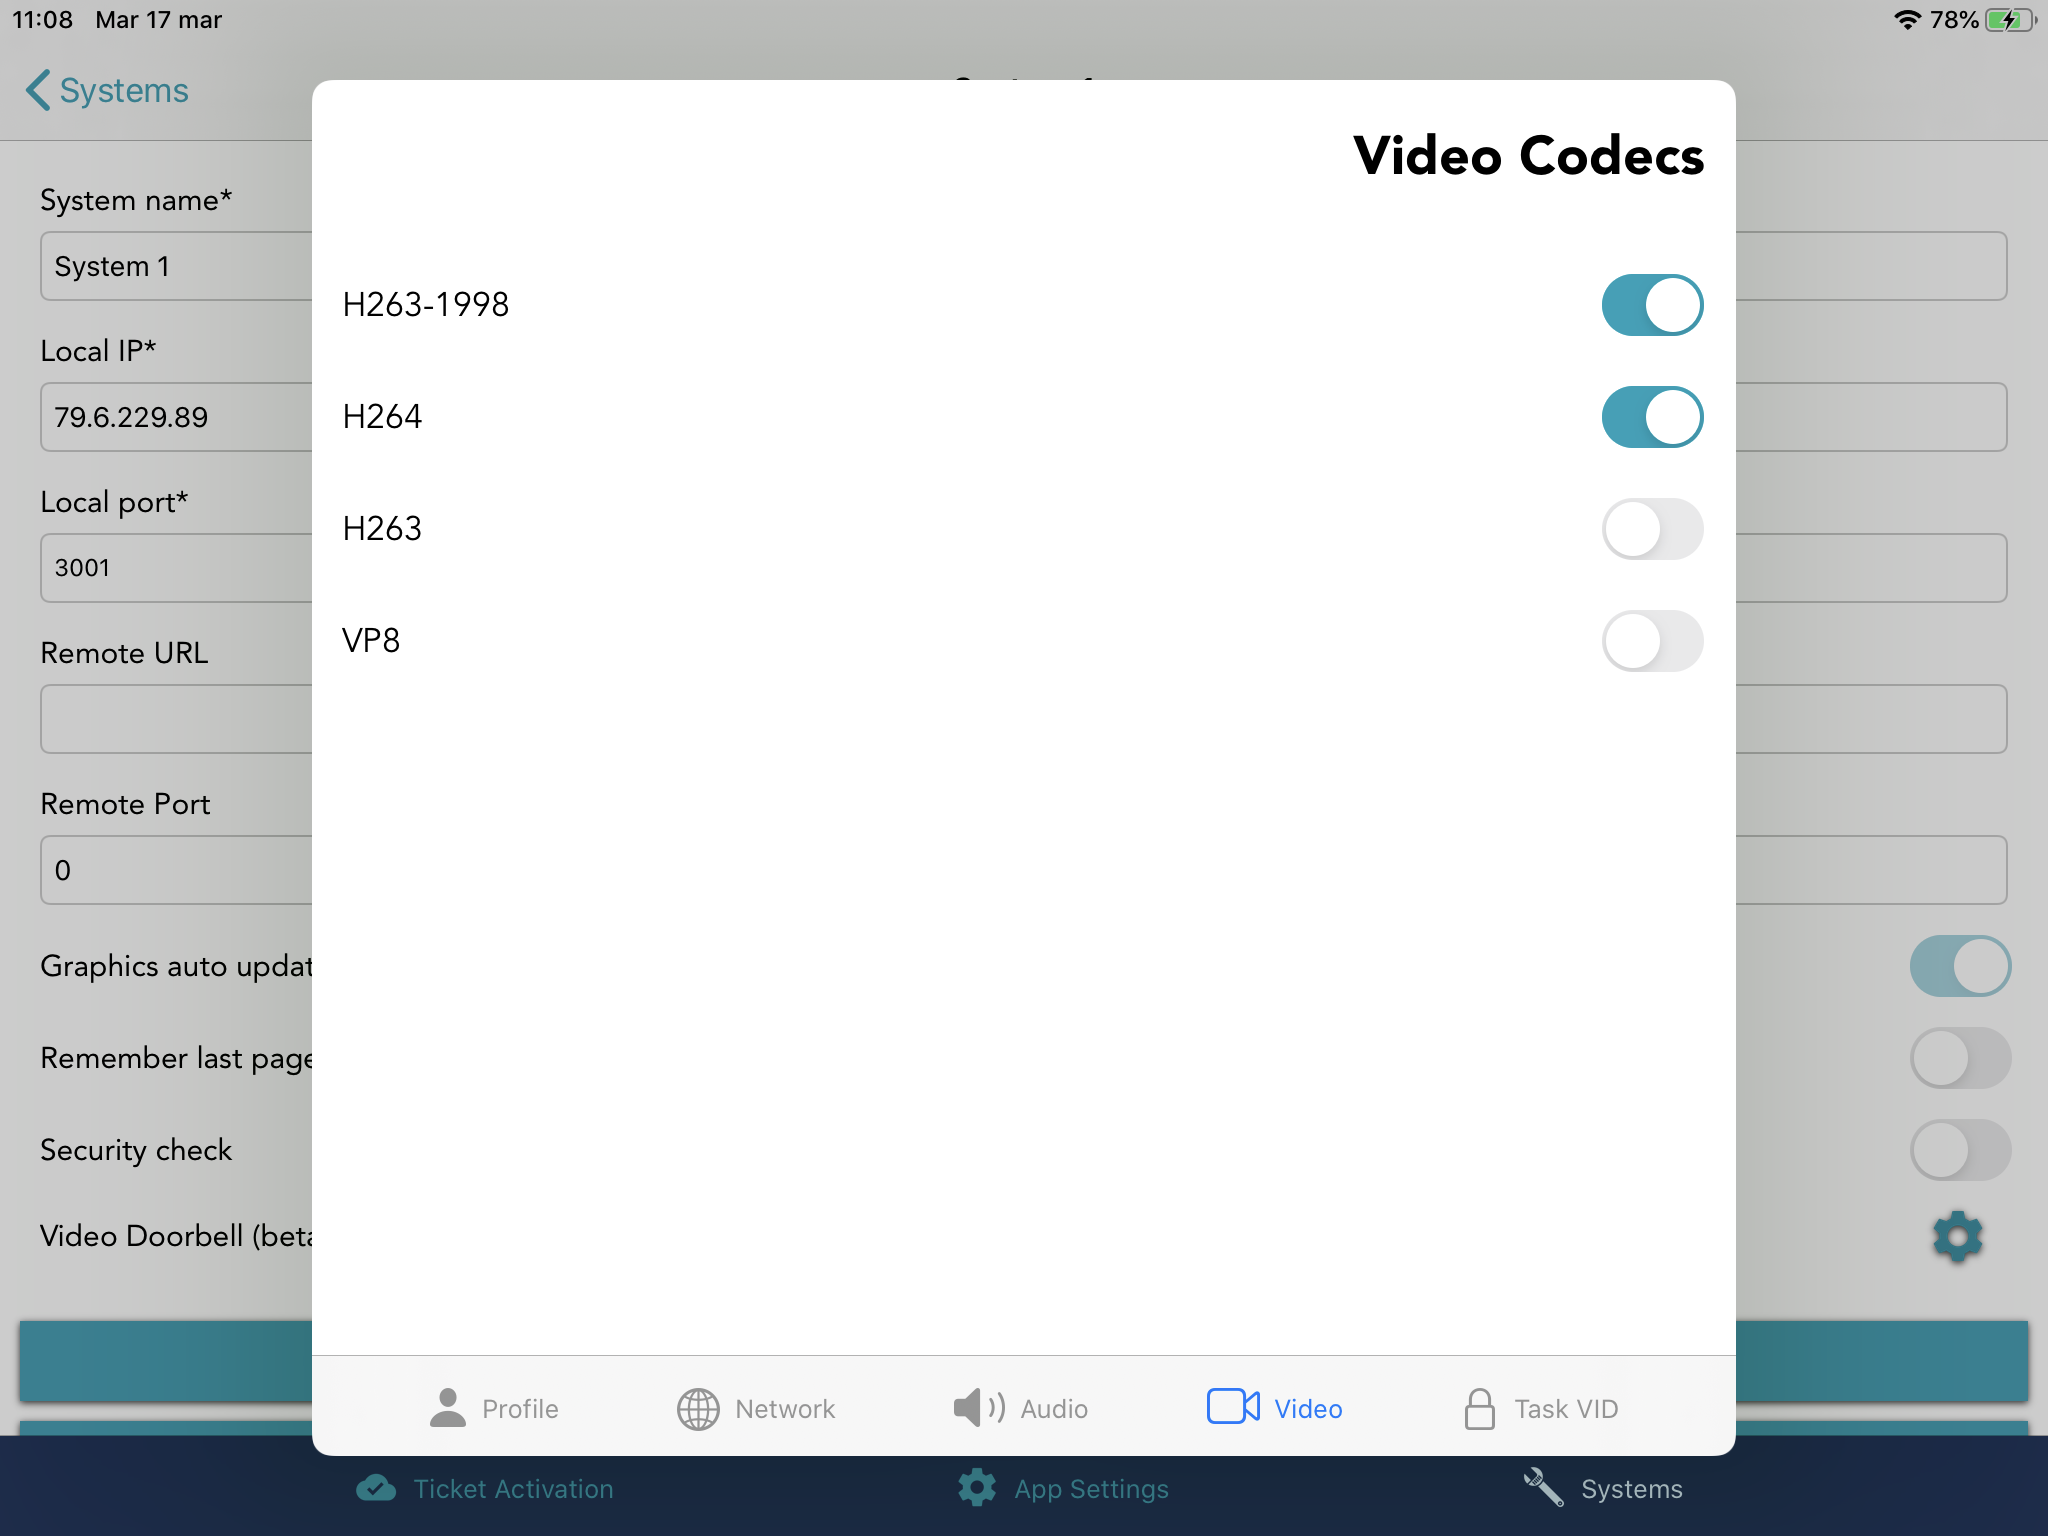
Video Codecs
Here you can choose your preferred video codecs for the video calls with your SIP Doorbell such as H264 or H263.
Task VID
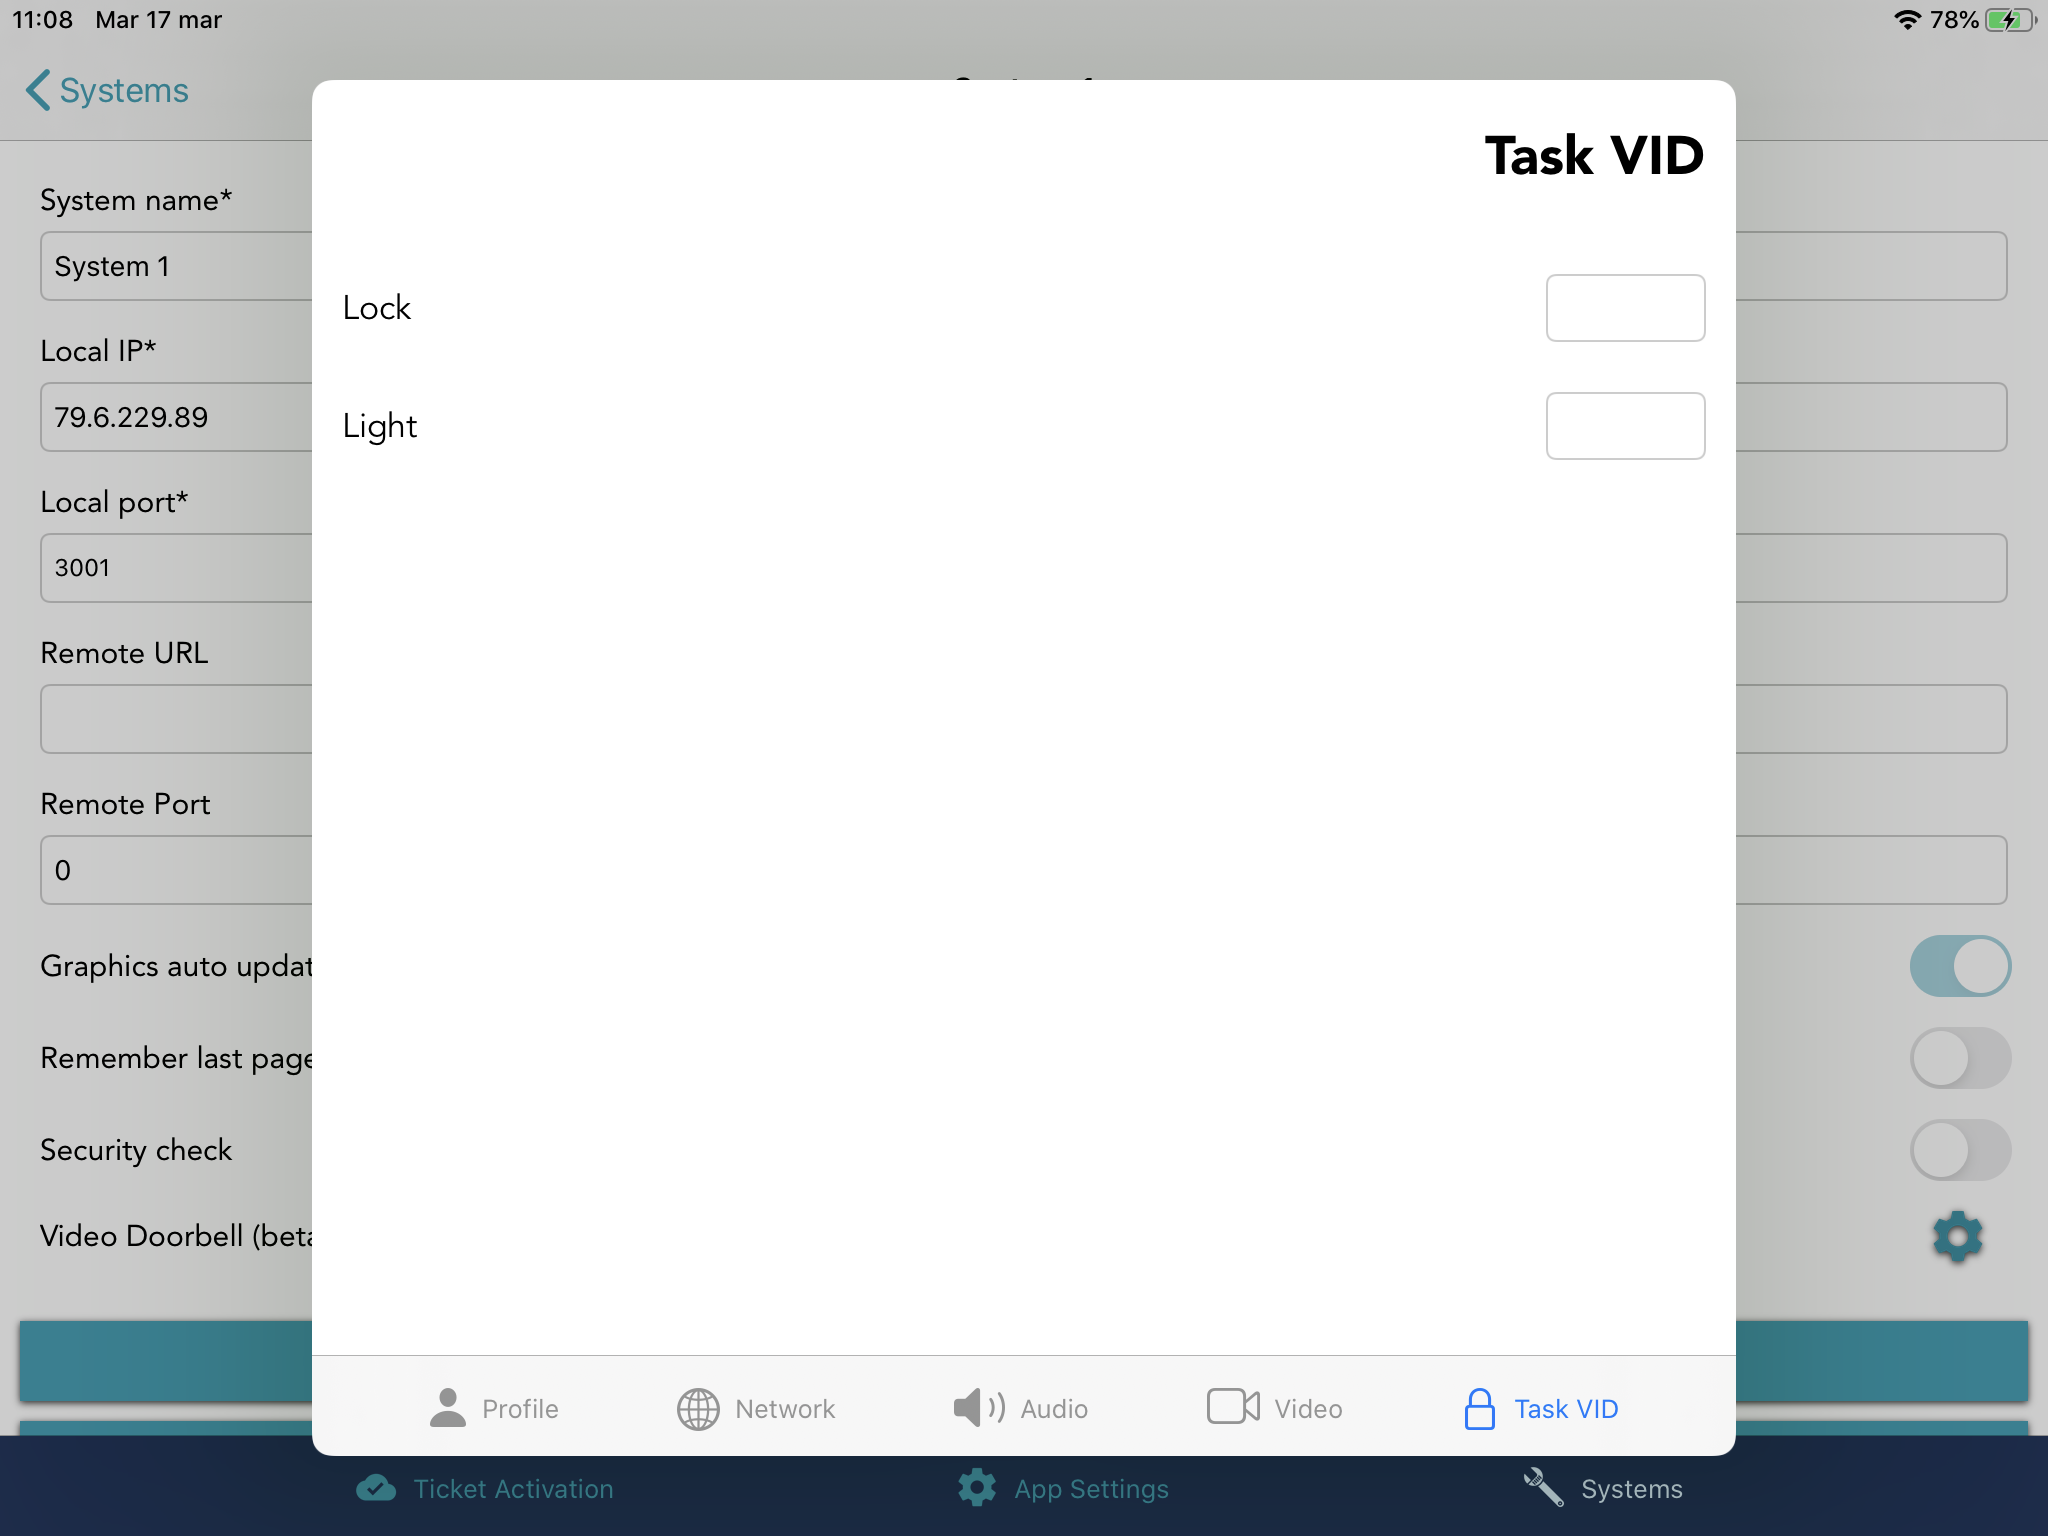
When you receive a call from the doorbell, you could launch a task for unlocking your door/gates and another one for turning on the lights.
In this section you can specify the Task VIDs of the tasks to launch.
If you leave the selection empty, the button for that function is not showed when receiving a call.
Font
The following fonts are natively integrated into sweet home:
- Arial
- Calibri
- Trebuchet
- Verdana
All of the mentioned fonts are available in normal, bold, italic, and bold-italic styles.
With Sweet Home 5.2 custom fonts are supported both for iOS and Android. To import a custom font, you will need to create a folder named Fonts and insert all your .ttf files into it (Only .ttf files are supported). Thereafter you will need to insert the Fonts folder into the zip archive with LcdConfig.xml
and Images.
Note that on iOS the Fonts folder must contain a separate version of the font for the Bold. For example Angelina.ttf and AngelinaBold.ttf. For the Bold version you need to name it fontNameBold.ttf.
URL Schemes
URL schemes are a way for apps to communicate with each other and perform certain actions when specific URLs are opened. These schemes are essentially special web addresses that are recognized by certain apps and trigger a specific action within that app. For example, you may have seen a URL scheme used to launch a specific app or to open a certain screen within an app.
URL schemes are often used by developers to create deep links within their app, which allows users to easily navigate to a specific screen or feature within the app. This can be especially useful for apps with complex interfaces or a large number of features.
Schemes can greatly enhance the user experience and make it easier for users to navigate and interact with the app. However, it is important to note that not all apps support URL schemes, so it's important to check the documentation of each app to see if it has a scheme and what actions it supports.
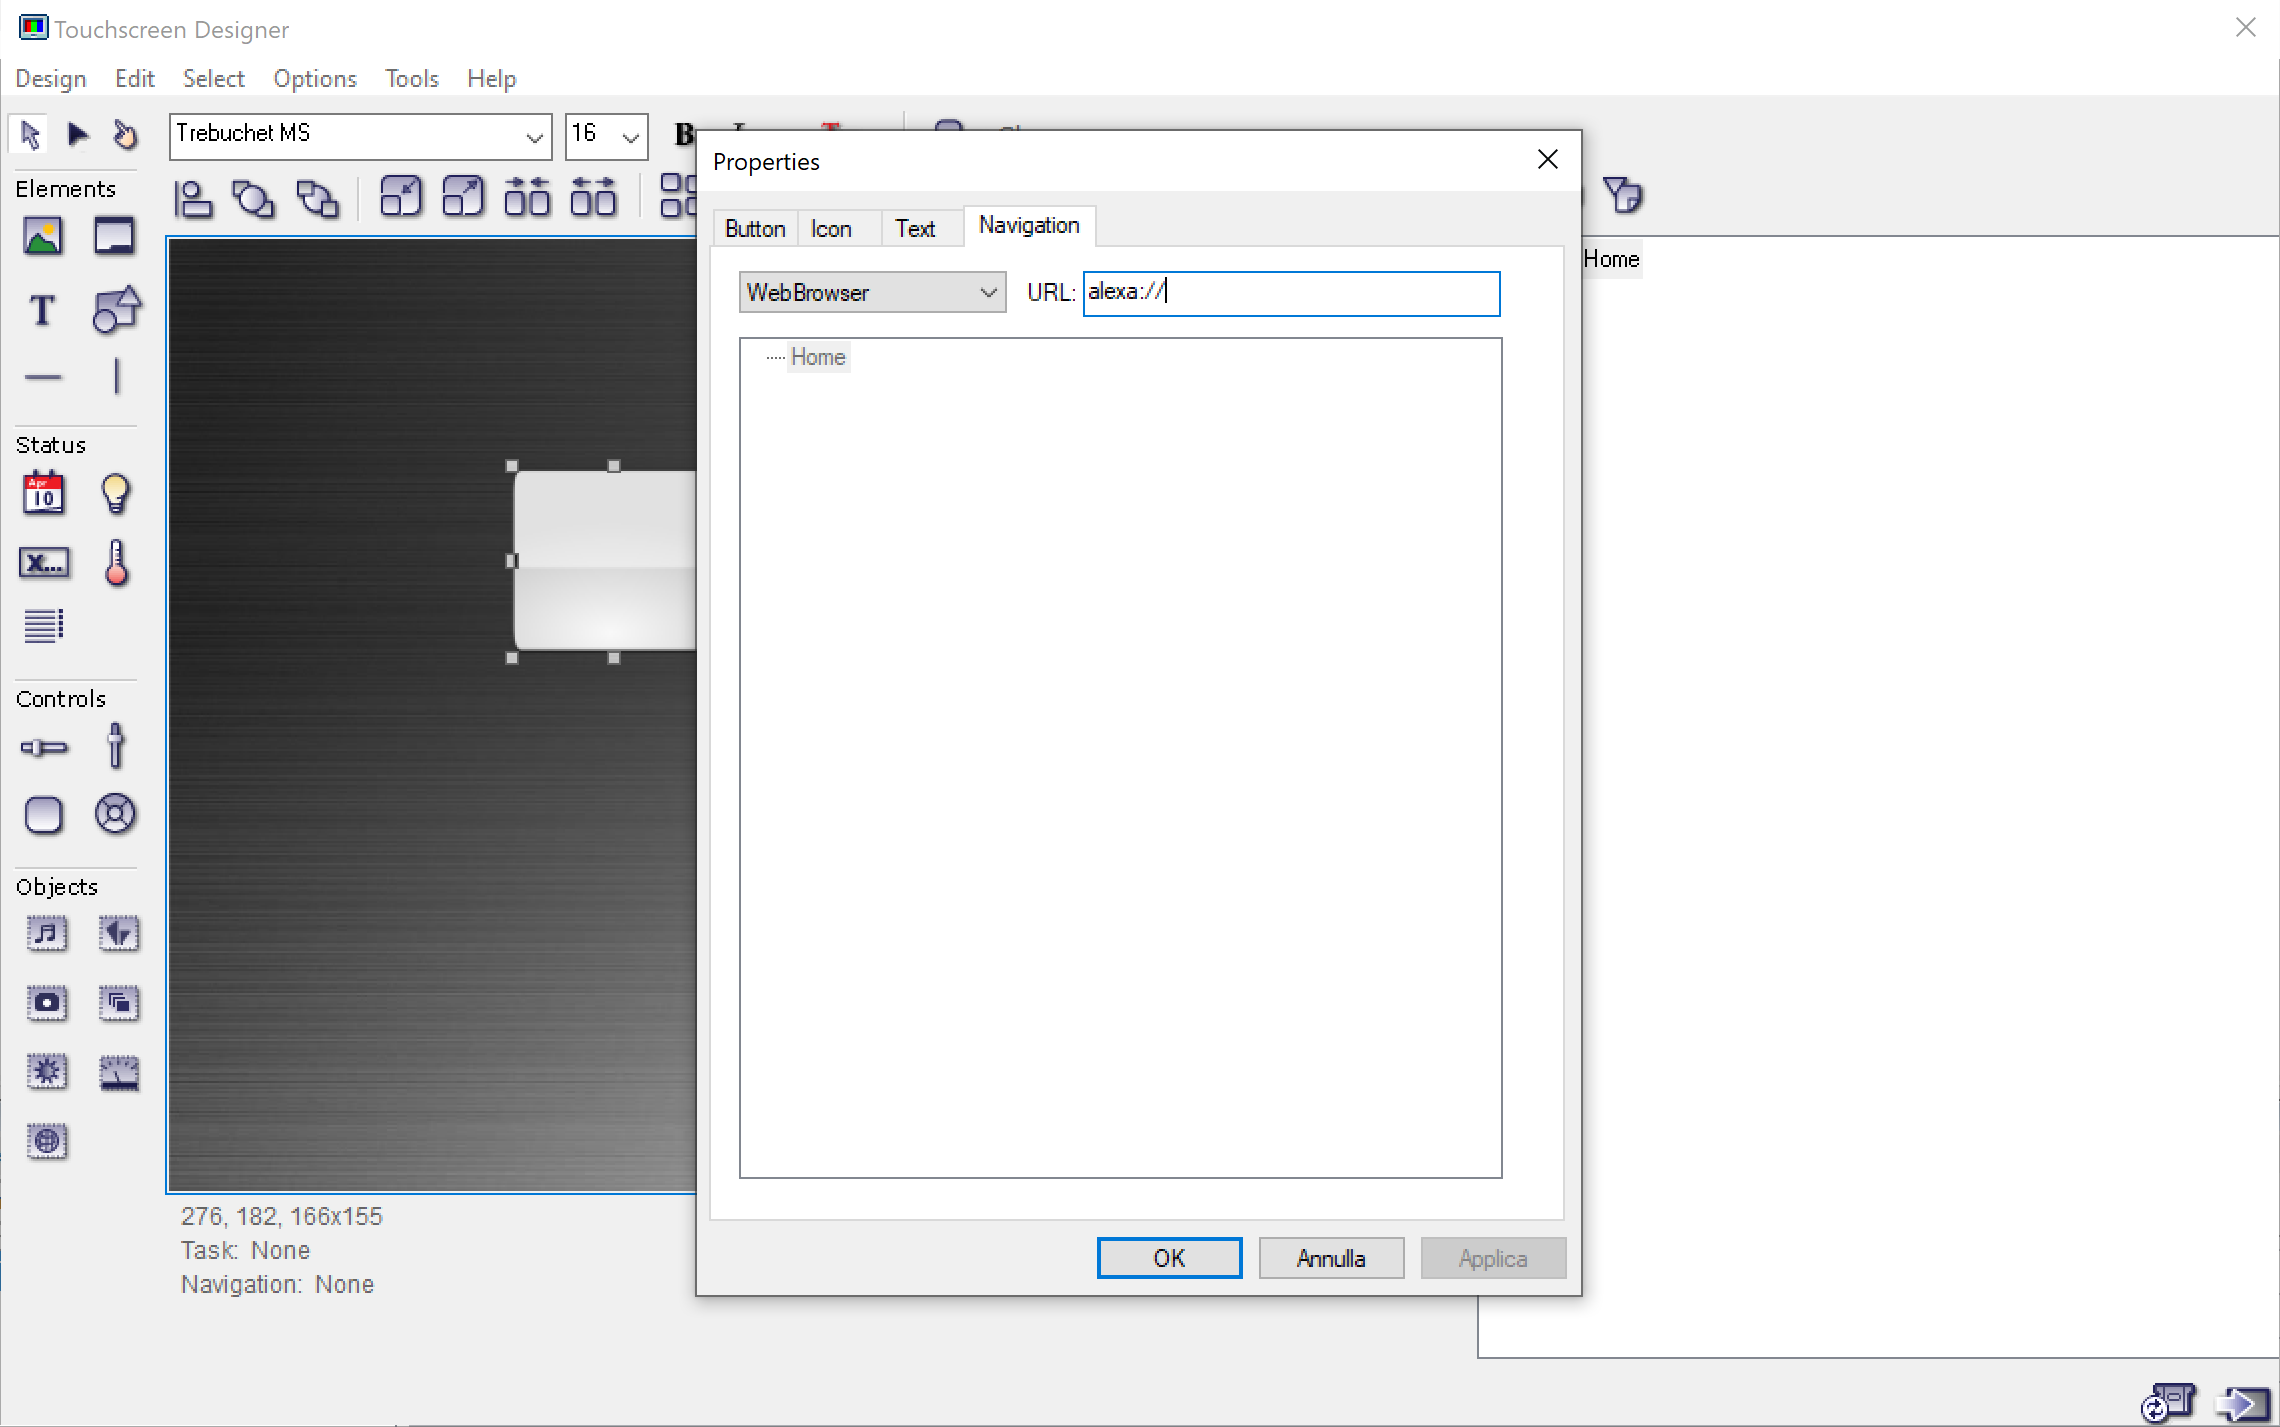
On Touchscreen Designer you can easily insert an URL Scheme by clicking on the object properties as it can be seen on the image above.
It is important to note that not all apps support URL schemes, so it's important to check the documentation of each app to see if it has a scheme and what actions it supports. Please refer to this document to search and test URL Schemes for the most popular applications.
After you setup a URL Scheme you can click on the associated entities to navigate to the chosen applictation. Please remember that the target application must be installed on the device.
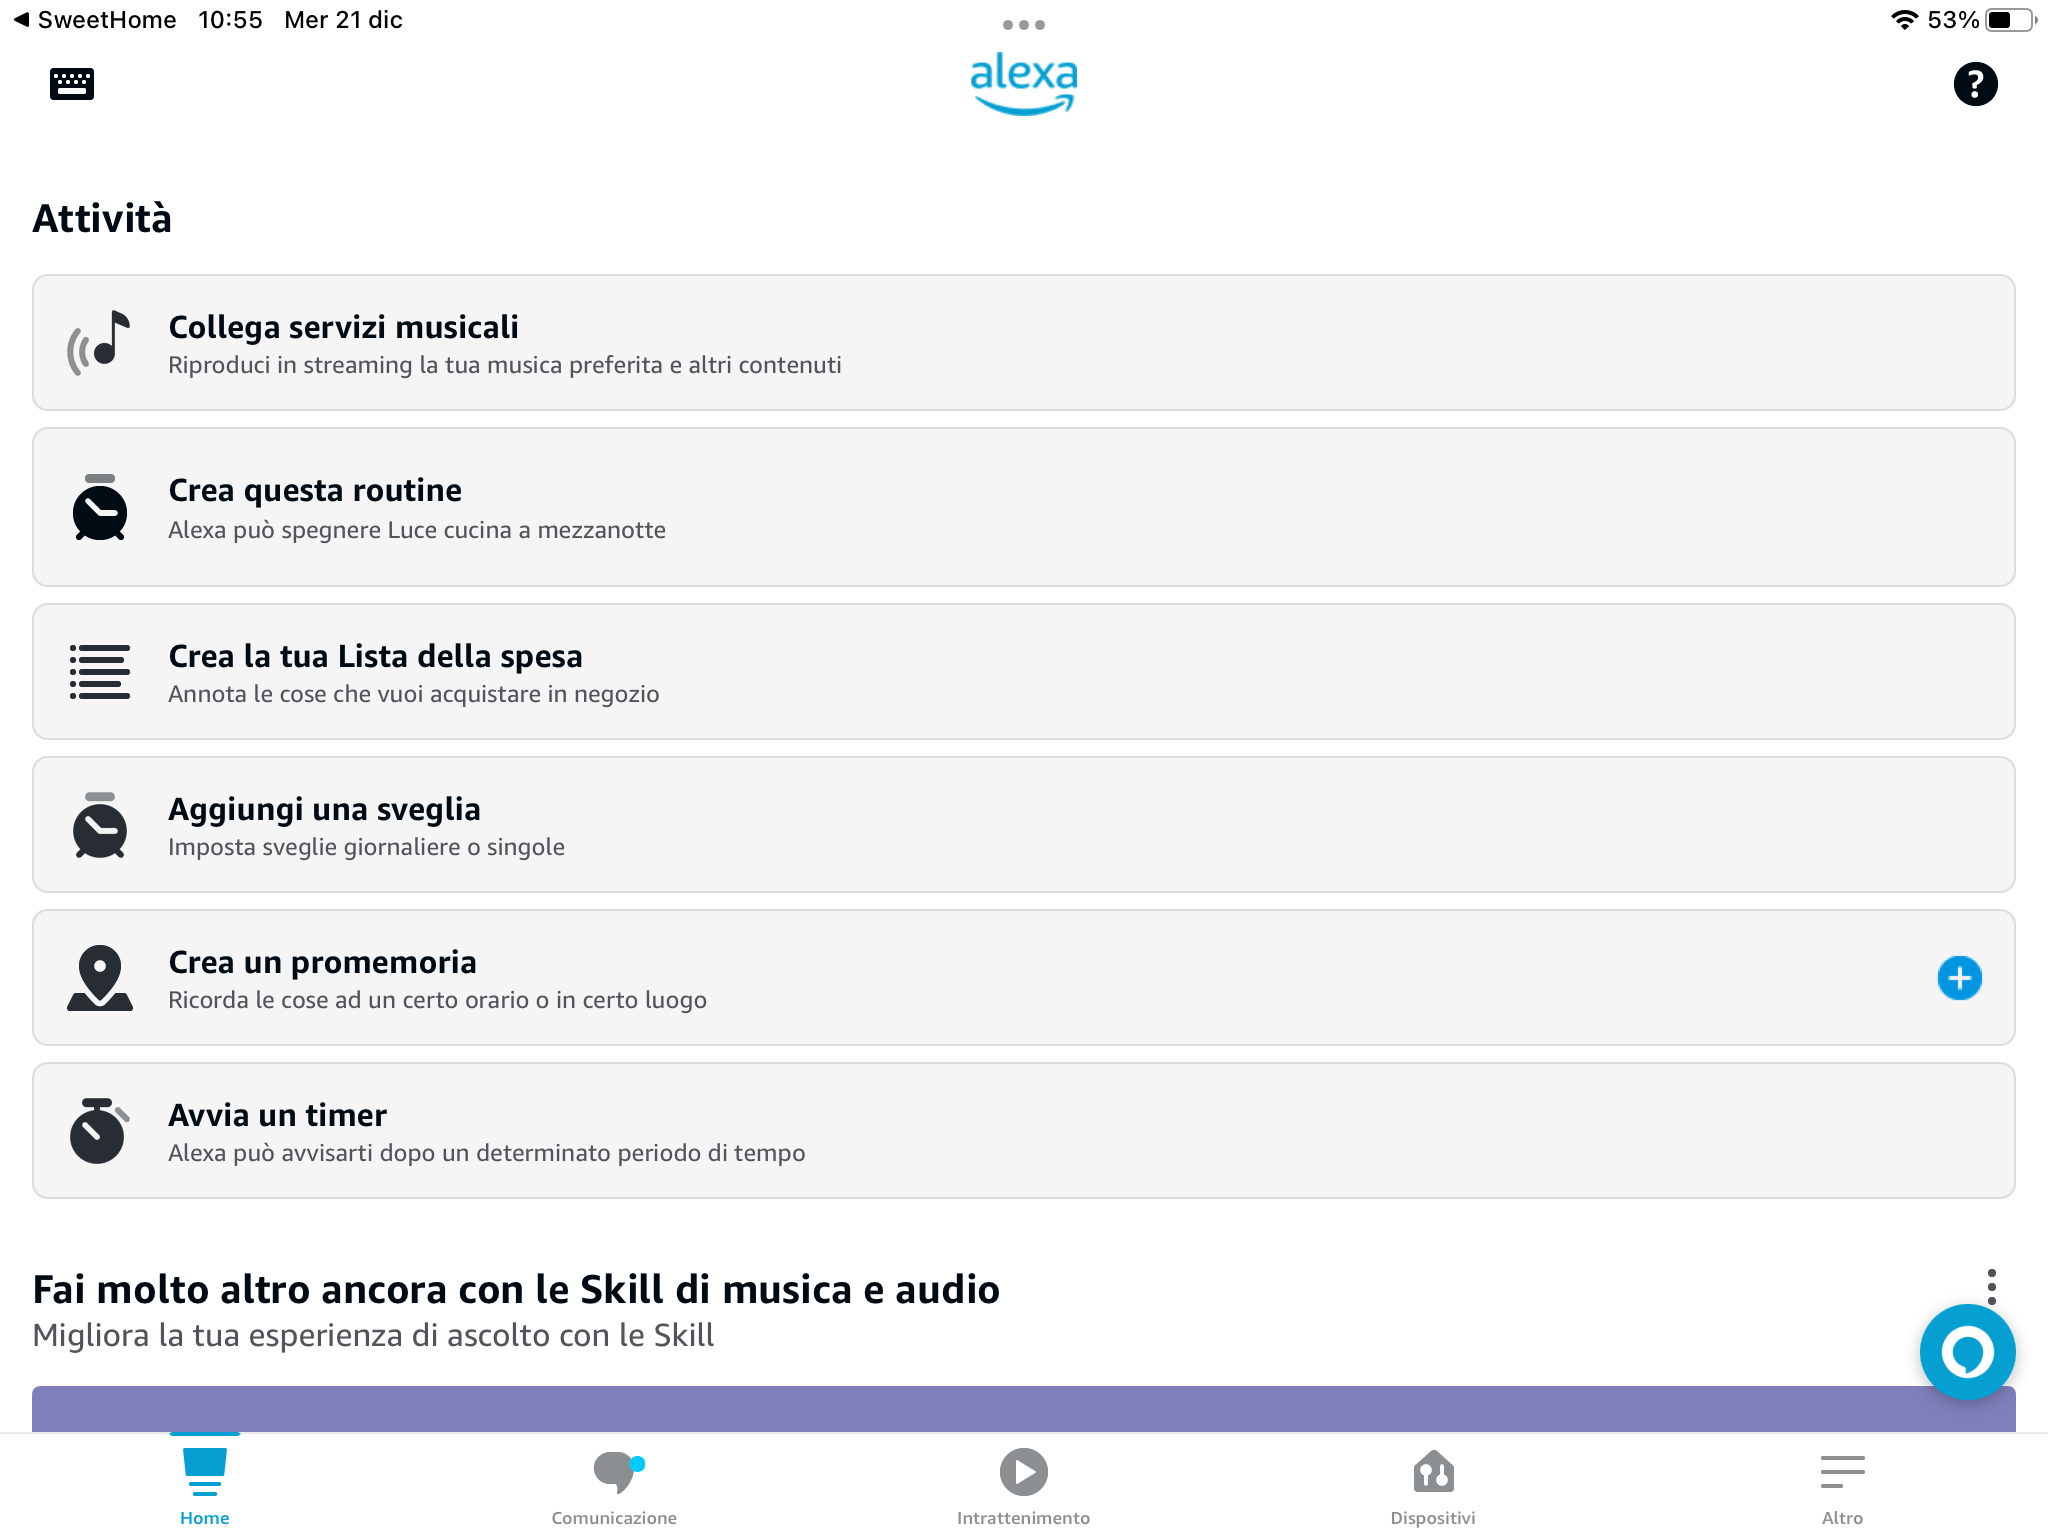
In the above example we have opened the Alexa Application on our device. Please note that on the left upper corner you have the backlink to Sweethome.
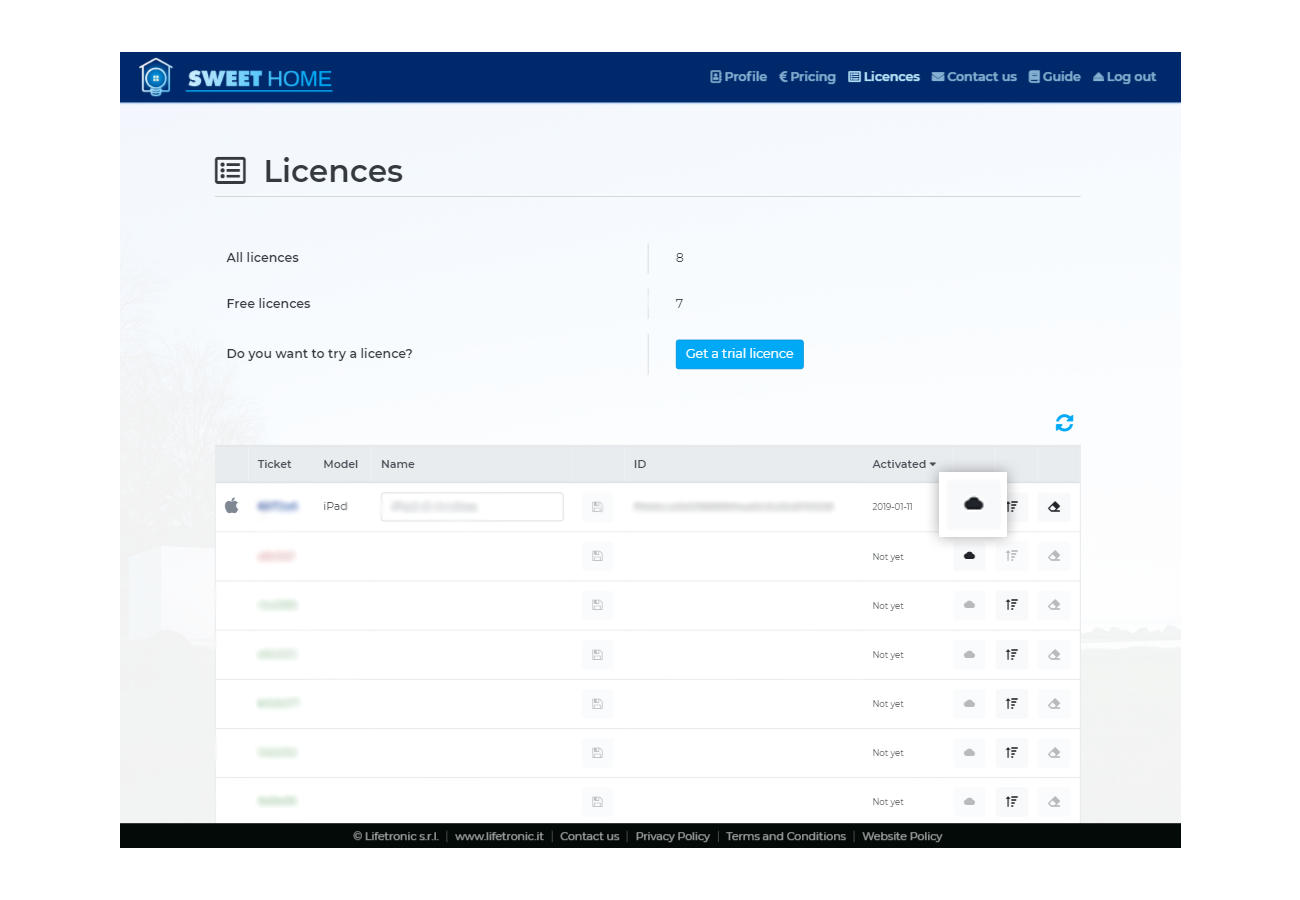
Cloud management
The Licences Page will enable you to manage all your Sweet Home tickets once you have logged into the web site.
On this page, for each ticket you can see the type of device on which it was loaded, the name and the date of registration.
The name of the device may be changed by writing in the box name and pressing the icon alongside in order for it to be saved.
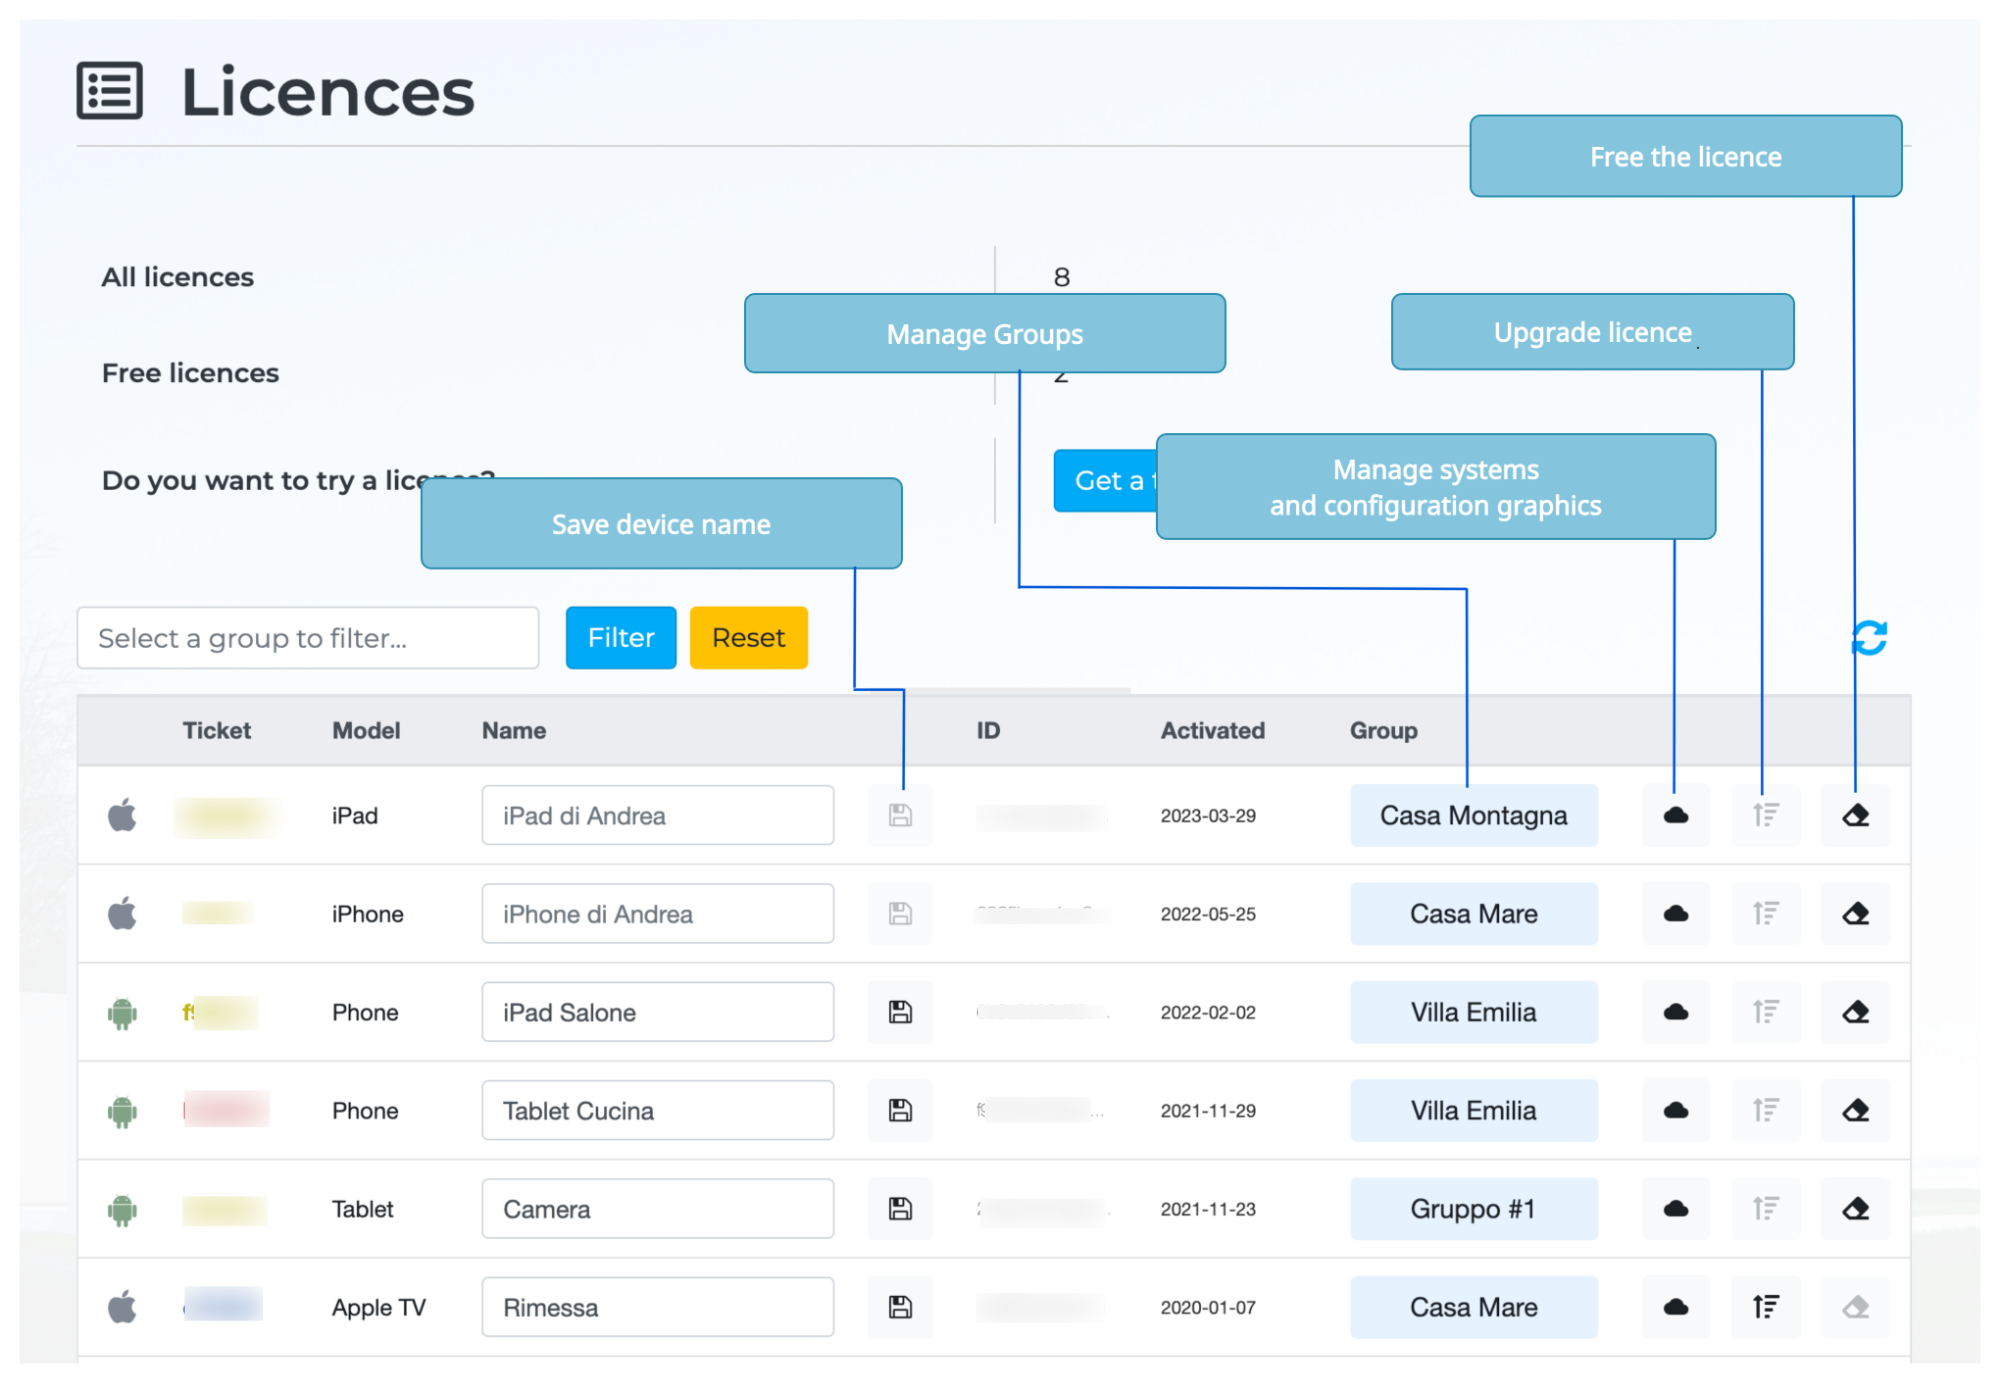
Organizing Licenses into groups
From this page you can organize licenses into groups. By clicking on the group icon on each licence row you have access to the group management modal window. From this window you can associate the corresponding licence to an existing group or a newly created one.
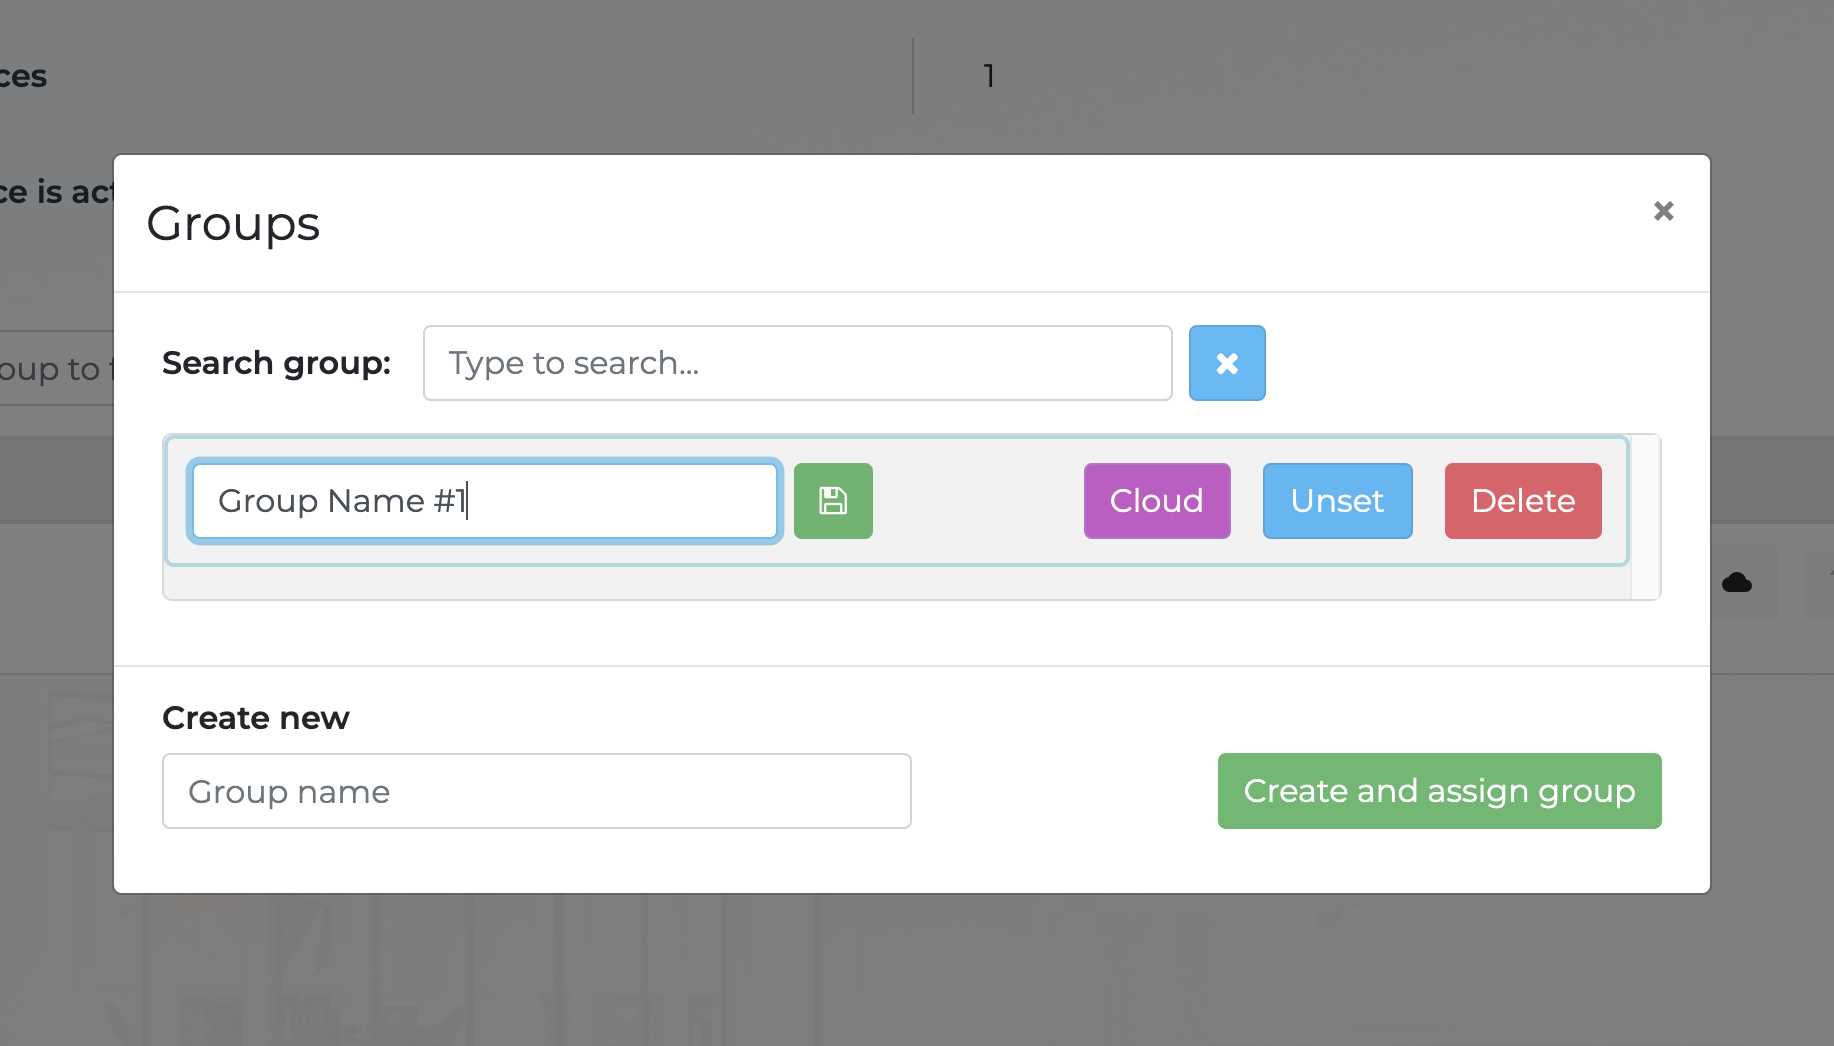
Clicking on the purple "Cloud" button you can manage the graphics for all the licenses in the group. Please refer to the dedicated section
Licenses Transferability
By clicking on the free the license button, you can release the license to register it on a new device.
ATTENTION: From Sweet Home 5.0 there may be a limited number of free license changes, which depends on the type of license you have purchased. Refer to the pricing page in order to ascertain the maximum number of licence changes provided for the particular licence that you purchased.
Upgrade Licenses
If you have the Sweet Home 4 license version, you canmay upgrade and make them
compatible with Sweet Home 5 by pressing the upgrade button thereafter you will be redirected to the license upgrade purchase page.
Manage system configuration and graphics
NOTE: This feature is only available for Sweet Home 5 licenses. If you currently have a Sweet Home 4 license, you will be required to upgrade it to enable this feature.

Cloud Systems Page shows all the systems configurable for that ticket.
NOTE: The number of systems available depends on the type of license purchased.
Entering into a system is possible.
Youcan also copy and paste configuration and graphics from one system to another belonging to the same user. To copy, click on the light gray clipboard button. Clicking on the blue arrow to the right takes you to the Configure System Page.
Configure system page

On this page, you can upload a new configuration or graphics file.
Once you have uploaded the graphics file or configuration, you can then download it to your device.
'Delete graphics and configuration' button deletes them from Cloud storage.
Configure system page (groups)
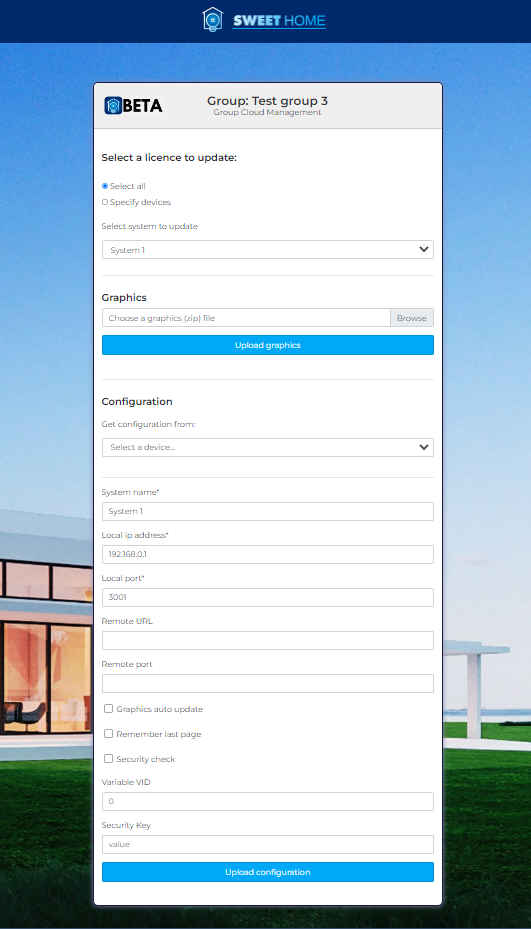
Similar to "Configure system page", you can upload a new configuration or graphics file for every license associated to the group, or specifying the licenses you want to update.
Once you have uploaded the graphics file or configuration, you can then download it to your device.
Graphics auto update
Provided you enabled “graphics auto update” in the system's preferences, Sweet Home will automatically check for updated graphics each time the system is opened.
Each time new graphics are uploaded to the System page in the Sweet Home portal, the app will automatically request the user for authorization to replace the graphics.
By pressing YES, the new graphic is automatically downloaded onto your device.

Webinar
Live Basic Training ITA
Webinar Italian. Live Basic Training on 19.02.2021
Live Basic Training ENG
Webinar english. Live Basic Training on 19.02.2021


